Foolproof Deviled Eggs: Silky and Smoky
- Time: Active 20 minutes, Passive 12 minutes, Total 32 minutes
- Flavor/Texture Hook: Silky smooth centers with a bold, smoky finish
- Perfect for: Holiday gatherings, sophisticated starters, or high protein meal prep
- Making This Foolproof Deviled Eggs Recipe Now
- Why This Method Simply Works
- Component Analysis and Selection
- Choosing the Right Elements
- Required Tools for Best Results
- Stepwise Guide from Prep to Plate
- Troubleshooting Common Egg Mistakes
- Adjusting for Your Party Size
- Exciting International Style Variations
- Smart Storage and Zero Waste
- Stunning Presentation for Every Party
- Recipe FAQs
- 📝 Recipe Card
Making This Foolproof Deviled Eggs Recipe Now
There is nothing quite like the sharp, bracing scent of apple cider vinegar hitting the air as you whisk a batch of filling, a smell that immediately signals a party is about to start.
I remember the first time I tried making these for a big summer bash, I was so worried about those dreaded green rings and stubborn shells that I almost gave up. But once you see that vibrant yellow yolk powder falling through a sieve like golden snow, you realize this isn't just cooking, it is a craft that produces a truly stunning starter.
We are moving far beyond the rubbery, sulfur heavy snacks of the past. This version focuses on a bold, international flavor profile, using Dijon mustard and smoked paprika to create a depth that is much more exciting than the standard picnic fare.
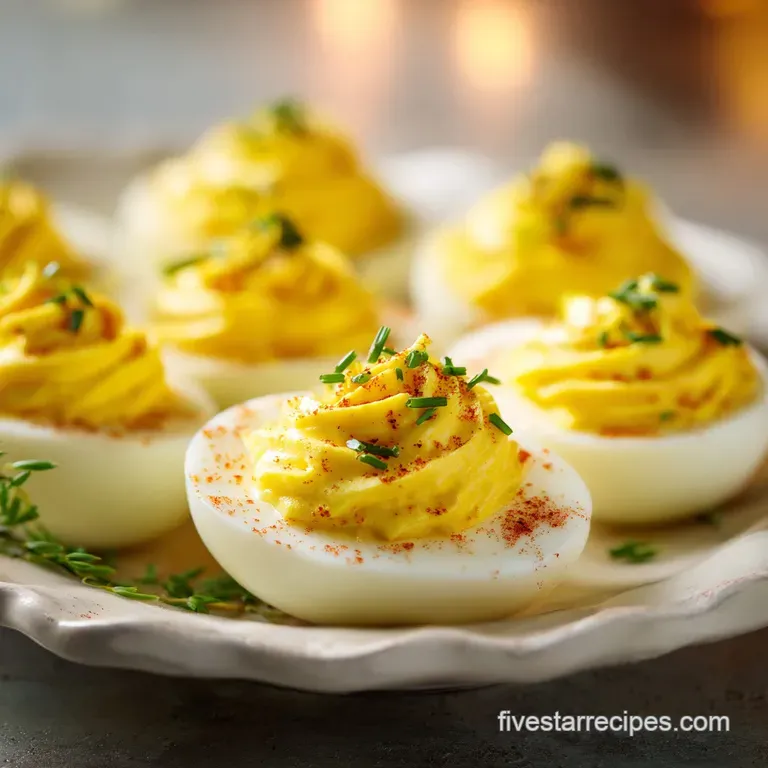
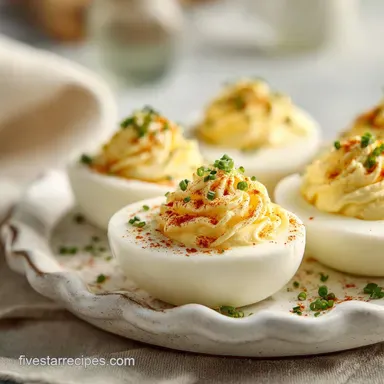
You want an appetizer that grabs attention, and the contrast between the snowy white base and the rich, piped filling topped with vivid green chives provides exactly that "wow" factor.
Trust me, once you master the "hot start" method, you will never go back to the old way of boiling eggs. It is a quick win that saves you from the frustration of mangled whites and ensures your platter looks professional.
We are looking for a result that is velvety on the tongue and visually striking, a far cry from the simple deviled eggs you might find in a plastic grocery store container.
Why This Method Simply Works
Understanding what happens inside that shell is the secret to moving from an amateur cook to a kitchen pro. It is not about luck, it is about controlling the environment of the egg to get the exact texture we crave.
- Thermal Shock: Dropping cold eggs into boiling water causes the egg white to pull away from the membrane almost instantly. This creates a physical gap that makes peeling a dream.
- Denaturation Control: By simmering for exactly 12 minutes, we ensure the proteins set firmly enough to hold their shape without becoming rubbery or developing that unappealing sulfur scent.
- Fat Emulsification: Whisking the yolks with high-quality mayonnaise creates a stable emulsion that stays creamy even after being refrigerated for several hours.
- Particle Refinement: Pushing the yolks through a fine sieve breaks down any clumps, ensuring the texture is consistently silky rather than grainy or lumpy.
| Egg Doneness | Cook Time | Internal Texture | Visual Cue |
|---|---|---|---|
| Soft Boiled | 6 minutes | Liquid yolk | Jammy center |
| Medium Boiled | 9 minutes | Custard like | Slightly translucent |
| Hard Boiled | 12 minutes | Fully set | Solid pale yellow |
The choice of a 12 minute cook time is non negotiable for this foolproof deviled eggs recipe now. It provides the structural integrity needed to pipe the filling high into the whites while maintaining a tender bite that melts away.
Using 2 liters (2 quarts) of water ensures the temperature doesn't drop too significantly when the cold eggs are introduced, keeping the cooking curve consistent.
Component Analysis and Selection
| Ingredient | Science Role | Pro Secret |
|---|---|---|
| Large Eggs | Structural Base | Use eggs that are at least a week old for easier peeling. |
| Mayonnaise | Emulsifier | Choose a high fat, egg yolk heavy brand for a richer mouthfeel. |
| Apple Cider Vinegar | pH Balancer | The acidity brightens the heavy fats and cuts through the richness. |
| Smoked Paprika | Flavor Depth | Always use fresh paprika to ensure the aroma is earthy and bold. |
Selecting the right components is what differentiates a standard snack from an international caliber starter. For instance, the apple cider vinegar doesn't just add tang, it actually helps stabilize the yolk mixture.
If you find yourself out of a specific item, there are several ways to pivot without losing the soul of the dish.
Choosing the Right Elements
- 12 large eggs: Cold from the fridge. Why this? The temperature difference is vital for the thermal shock peeling method.
- 2 liters water: Filtered is best. Why this? Provides the volume needed to maintain a steady simmer.
- 1 tsp salt: Fine sea salt. Why this? Seasons the whites slightly during the boiling process.
- 0.5 cup mayonnaise: Full fat only. Why this? Provides the velvety carrier for all other bold flavors.
- 1.5 tsp apple cider vinegar: Raw or filtered. Why this? Adds a complex fruity acidity compared to white vinegar.
- 1 tsp Dijon mustard: Smooth variety. Why this? Acts as a secondary emulsifier and adds a sophisticated pungent kick.
- 0.25 tsp sea salt: Finely ground. Why this? Dissolves quickly into the yolk cream for even seasoning.
- 0.125 tsp black pepper: Freshly cracked. Why this? Adds a subtle heat and visual interest to the filling.
- 1 dash Tabasco sauce: Or similar vinegar based hot sauce. Why this? Enhances the other flavors without making the dish overtly spicy.
- 1 tsp smoked paprika: Spanish Pimentón is excellent. Why this? Gives the stunning red finish and a deep, woody aroma.
- 1 tbsp fresh chives: Finely snipped. Why this? Provides a sharp, onion like freshness and a pop of green.
| Original Ingredient | Substitute | Why It Works |
|---|---|---|
| Apple Cider Vinegar | Lemon Juice | Provides a similar acidic profile with a brighter, citrusy note. |
| Dijon Mustard | Brown Mustard | Maintains the pungency but adds a coarser, more rustic texture. |
| Mayonnaise | Greek Yogurt | Offers a tangier, lighter filling. Note: Result is less silky. |
| Smoked Paprika | Cayenne Pepper | Adds a significant heat boost. Note: Use much less than paprika. |
When you are looking to create a truly bold experience, the quality of your spices matters more than you might think. A jar of paprika that has been sitting in your cupboard for three years won't have the same aromatic impact as a freshly opened tin.
You want that earthy, smoky scent to hit the nose the moment the platter is placed on the table.
Required Tools for Best Results
For a stunning presentation, the right tools are just as important as the ingredients. You will need a large stockpot to hold the 2 liters of water and the eggs without overcrowding. A slotted spoon is essential for lowering the eggs into the boiling water carefully so they don't crack on the bottom of the pot.
A medium sized bowl should be prepared as an ice bath, filled with 50% ice and 50% water. This isn't just a suggestion, it is a critical step to halt the cooking process and prevent the yolks from overcooking. You will also need a fine mesh sieve.
While some people just mash their yolks with a fork, pushing them through a sieve creates a powder like consistency that leads to a much more professional, velvety filling. Finally, a piping bag fitted with a star tip will give your eggs that iconic, high end look that is sure to impress.
Stepwise Guide from Prep to Plate

- Boil water. Fill a large stockpot with 2 liters of water and 1 tsp salt. Bring to a rolling boil over high heat. Note: Salt helps set any whites that might leak if a shell cracks.
- Add eggs. Carefully lower cold eggs into the boiling water using a slotted spoon. Reduce heat to a simmer and cook for exactly 12 minutes. You should hear a gentle bubbling, not a violent clattering.
- Shock eggs. Prepare an ice bath with 50% ice and 50% water. Immediately transfer eggs to the ice bath for 15 minutes to halt cooking.
- Peel shells. Gently crack eggshells and peel under a thin stream of cool running water. Watch for the membrane to slip away easily from the white. Pat the whites dry.
- Separate yolks. Slice eggs lengthwise. Remove yolks and push them through a fine mesh sieve into a medium bowl to create a fine powder.
- Mix filling. Whisk mayonnaise, vinegar, Dijon mustard, sea salt, and black pepper into the yolks. Stop when the mixture is smooth and the scent of vinegar is bright.
- Emulsify. Add the dash of Tabasco and whisk vigorously until the mixture is glossy and holds a soft peak.
- Pipe centers. Transfer the filling to a piping bag with a star tip. Pipe the mixture into the centers of the egg whites.
- Garnish. Dust with smoked paprika and top with snipped chives. The aroma of the smoked pepper should be immediate.
| Method | Time | Texture | Best For |
|---|---|---|---|
| Stovetop (Rolling Boil) | 12 minutes | Firm but tender | Traditional deviled eggs |
| Oven (Steam) | 20 minutes | Slightly denser | Large batch prep |
| Pressure Cooker | 5 minutes | Very consistent | Difficult to peel eggs |
If you find yourself running short on time or ingredients, remember that the "Recipe Now" aspect of this is about efficiency. You can actually prep the whites and the yolk mixture a day in advance, storing them separately to maintain that fresh, vibrant look. If you love a variety of bold appetizers, you might even consider serving these alongside a batch of my Peanut Butter Fudge for a mix of salty and sweet that keeps guests coming back to the snack table.
Troubleshooting Common Egg Mistakes
The most common issue I hear about is the "sulfur ring," that greenish gray layer around the yolk. This is simply a sign of overcooking. When the iron in the yolk reacts with the sulfur in the white at high heat for too long, that ring appears.
By sticking to the 12 minute timer and the 15 minute ice bath, you completely bypass this problem.
Why Your Filling Is Lumpy
If you find the centers of your eggs are grainy or contain small chunks, it usually means the yolks weren't processed finely enough. This often happens when people try to save time by using a fork or a potato masher.
The starches and fats in the yolk need to be completely broken down to integrate with the mayonnaise properly.
| Problem | Root Cause | Solution |
|---|---|---|
| Rubbery Whites | Overcooked at high heat | Stick to a gentle simmer for 12 minutes. |
| Difficult Peeling | Eggs were too fresh | Add 1/2 tsp baking soda to the boiling water. |
| Runny Filling | Too much liquid/vinegar | Add an extra hard boiled yolk or a tsp of instant mashed potato flakes. |
Common Mistakes Checklist
- ✓ Never start the eggs in cold water; always use a "hot start" for easier peeling.
- ✓ Don't skip the ice bath, as carryover heat will overcook the yolks.
- ✓ Avoid using light mayonnaise, which lacks the fat needed for a silky emulsification.
- ✓ Ensure the egg whites are completely dry before piping to prevent the filling from sliding.
- ✓ Use a star tip for piping to increase surface area for the paprika garnish.
One thing to keep in mind is that the size of the egg matters. If you are using medium eggs instead of large ones, you may want to reduce the cook time by about 60 seconds. However, for this foolproof deviled eggs recipe now, the standard 12 minutes for large eggs from the fridge is the golden rule.
If your filling seems a bit too stiff, don't be afraid to add an extra teaspoon of mayonnaise to reach that perfect, pipeable consistency.
Adjusting for Your Party Size
Scaling this recipe is quite simple as long as you maintain the ratio of fat to acid. If you are cutting the recipe in half for a quiet night in, simply use 6 eggs and halve all other ingredients. You can still use the 2 liters of water to ensure the thermal mass remains high, which helps with the cooking consistency.
When scaling up for a massive party, say for 48 or 72 servings, you should work in batches of 12 or 24 eggs. Crowding too many eggs into one pot can cause them to knock against each other and crack, and it also makes it harder to maintain a consistent simmer.
For spices like paprika and salt, I recommend increasing them by 1.5x rather than a full 2x when doubling the recipe, then tasting and adjusting. This prevents the filling from becoming overly salty or pungent too quickly.
Exciting International Style Variations
If you want to take this foolproof deviled eggs recipe now to a global level, the variations are endless. You can swap the Dijon for wasabi and the chives for toasted sesame seeds for a Japanese inspired twist.
Or, go for a Mediterranean vibe by replacing half the mayonnaise with hummus and topping the eggs with a single kalamata olive slice.
- The "Green Devil": Swap half the mayo for mashed avocado and add a squeeze of lime instead of vinegar. This creates a stunning green filling that is incredibly rich.
- Bacon and Jalapeño: Fold in very finely minced crispy bacon and top with a thin slice of fresh jalapeño for a bold, smoky, and spicy kick.
- Everything Bagel: Omit the paprika and sprinkle the finished eggs with "everything bagel" seasoning for a salty, textural contrast.
For those who enjoy a nostalgic touch at their gatherings, these eggs are a fantastic partner to other retro style treats. For instance, pairing these savory bites with my Jello Jigglers creates a fun, kitschy spread that appeals to both kids and adults. It is all about creating a menu that feels cohesive and exciting.
Smart Storage and Zero Waste
Keeping your starters fresh is key to a successful event. Deviled eggs are best enjoyed within a few hours of being made, but you can store them in the fridge for up to 2 days. To prevent them from drying out, place them in a specialized egg carrier or a shallow container and cover tightly with plastic wrap.
If you have leftover filling but no whites, it makes an incredible spread for a sourdough toast or a bold addition to a potato salad.
For zero waste, don't throw away those eggshells! Once crushed, they can be added to your compost or even sprinkled around garden plants like tomatoes to provide a calcium boost. If you find yourself with extra chives, you can freeze them in an ice cube tray with a little bit of olive oil to use in future sautéed dishes.
Even the small amount of leftover vinegar in the bottle can be used to quick pickle some red onions for a different garnish on your next batch.
Stunning Presentation for Every Party
When it comes to serving, the goal is to make these look as bold as they taste. A marble slab or a dark ceramic platter provides a beautiful contrast to the bright white eggs. Arrange them in a circular pattern or in neat rows, ensuring there is enough space between each one so guests can easily pick them up without disturbing the garnish.
You might hear people say that you need to add vinegar to the boiling water to make eggs easier to peel. This is actually a myth! While vinegar can help coagulate whites if a shell cracks, it doesn't actually penetrate the shell to help with peeling.
The thermal shock of the boiling water is the only thing that truly makes a difference. Another myth is that you should always use the freshest eggs possible. In reality, eggs that have been in your fridge for a week or two have a slightly higher pH, which makes the membrane less likely to stick to the shell, resulting in that flawless, smooth surface we are looking for.
By focusing on these small details, from the sieve technique to the 15 minute ice bath, you ensure that every single egg on your platter is a masterpiece. It's a simple process, but doing it with precision is what makes it a foolproof deviled eggs recipe now.
Go ahead and get that water boiling your guests are going to be talking about these eggs long after the party is over.

Recipe FAQs
What are the five golden rules of deviled eggs?
Use cold eggs, maintain a 12-minute simmer, use an ice bath for 15 minutes, sieve your yolks, and emulsify the filling completely. These steps ensure your whites are firm, yolks are creamy, and the final texture remains perfectly smooth.
What is the forgotten ingredient I always add to my deviled eggs?
A single dash of Tabasco sauce provides the necessary acidity and depth. It balances the richness of the mayonnaise without overpowering the flavor of the yolks.
Is it better to boil eggs the day before making deviled eggs?
Yes, boiling them a day ahead is excellent for planning. Keeping hard boiled eggs in their shells in the refrigerator for 24 hours makes them even easier to peel when you are ready to prepare the filling.
Is mayo or Miracle Whip better for deviled eggs?
high-quality mayonnaise is the superior choice for this recipe. Miracle Whip contains added sugar and spices that clash with the delicate balance of Dijon mustard and apple cider vinegar.
How to avoid the greenish sulfur ring around the yolk?
Stop the cooking process immediately by moving the eggs into a 50% ice and 50% water bath for exactly 15 minutes. This chemical reaction between iron and sulfur only occurs when eggs are held at high heat for too long.
How to get the smoothest possible filling?
Push your yolks through a fine mesh sieve into your mixing bowl before adding any liquids. This creates a fine powder that incorporates air and makes the emulsified base much creamier when you whisk in the mayonnaise and mustard.
Is it true I must use room temperature eggs?
No, this is a common misconception. You should lower cold eggs directly from the refrigerator into the boiling water to make them easier to peel after the 15-minute ice bath.
Foolproof Deviled Eggs
Ingredients:
Instructions:
Nutrition Facts:
| Calories | 69 calories |
|---|---|
| Protein | 3.2 g |
| Fat | 6.0 g |
| Carbs | 0.3 g |
| Fiber | 0 g |
| Sugar | 0.1 g |
| Sodium | 95 mg |
