Classic Baked Ziti: Sausage and Ricotta
- Time: Active 20 minutes, Passive 40 minutes, Total 60 minutes
- Flavor/Texture Hook: Savory mahogany sausage paired with silky ricotta and molten mozzarella
- Perfect for: Sophisticated Sunday dinners or a gourmet make-ahead family feast
- Master This Classic Baked Ziti Recipe
- Why This Works
- Component Analysis
- Understanding the Dish Specifications
- Selecting Your Gourmet Components
- Essential Tools for Success
- Executing the Layering Process
- Solving Common Culinary Hurdles
- Customizing Your Flavor Profile
- Adjusting the Recipe Volume
- Myths Regarding Baked Pasta
- Storage and Sustainability Habits
- Elegant Pairings for Dinner
- CRITICAL (🚨) Sodium Alert
- Recipe FAQs
- 📝 Recipe Card
Master This Classic Baked Ziti Recipe
The tradition of pasta al forno, or oven baked pasta, is deeply rooted in the sun drenched kitchens of Southern Italy, particularly in Campania and Sicily. Historically, ziti was the pasta of celebration, its name derived from the word "zite," or brides.
It was the centerpiece of wedding banquets, symbolizing a new beginning with its grand presence and rich, slow simmered sauces. When I first attempted this dish, I treated it like a simple casserole, but I soon realized that ziti demands the same respect as a multi layered lasagna.
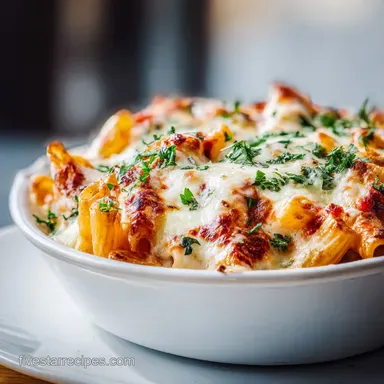
The true magic happens when the smooth, hollow tubes of ziti act as little chimneys, capturing the robust meat sauce and pockets of creamy cheese. It is not just about tossing ingredients together; it is about the architecture of the layers.
In Naples, mothers would spend hours over a ragù before even thinking about the pasta. We want that same depth of flavor, ensuring the Italian sausage achieves a deep mahogany hue before it ever meets the tomatoes.
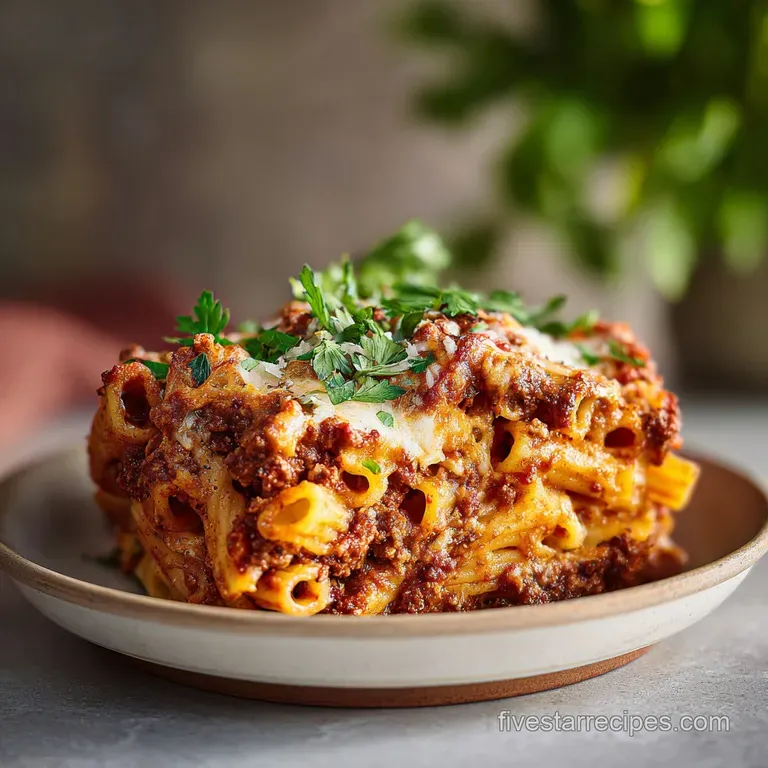
We are aiming for a result that feels intentional and elevated. It's about that specific moment when you pull the dish from the heat and the mozzarella has transitioned from simple white shreds into a bubbly, bronzed landscape.
This isn't just a weeknight meal; it's a testament to the beauty of simple, high-quality ingredients treated with a master's touch.
Why This Works
- Fat Emulsification: The egg added to the ricotta acts as a stabilizer, ensuring the cheese stays velvety and moist rather than turning grainy or "weeping" moisture during the over high heat bake.
- Starch Management: By boiling the pasta for exactly 2 minutes less than the package instructions, we allow the ziti to finish its hydration process inside the sauce, absorbing the savory juices rather than becoming mushy.
- Maillard Complexity: Searing the Italian sausage until it reaches a dark mahogany color creates a foundation of umami that a simple light browning cannot replicate.
- Structural Integrity: Layering the ricotta mixture in the center, rather than mixing it entirely with the pasta, creates distinct texture profiles in every bite.
| Servings | Pasta Quantity | Sauce Required | Pan Size |
|---|---|---|---|
| 4 people | 225g ziti | 400ml sauce | 8x8 inch square |
| 8 people | 450g ziti | 800ml sauce | 9x13 inch rectangular |
| 12 people | 675g ziti | 1.2L sauce | Two 9x9 inch pans |
We must consider the guest list when preparing this dish. If you find yourself hosting a larger gathering, the 9x13 inch format is the gold standard, providing enough surface area for that coveted cheese crust while maintaining a deep, indulgent center.
Component Analysis
| Ingredient | Science Role | Pro Secret |
|---|---|---|
| Whole Milk Ricotta | Provides moisture and creamy mouthfeel | Drain in a fine mesh sieve for 10 minutes to remove excess whey for a thicker texture |
| Large Egg | Protein binder for the cheese layers | Ensure it is at room temperature to emulsify perfectly with the cold ricotta |
| Low Moisture Mozzarella | Structural stretch and fat content | Avoid pre shredded bags; freshly grated cheese melts without the graininess of anti caking starches |
| Italian Sausage | Salt and fat delivery system | Press the meat flat in the pan initially to maximize surface area contact for better browning |
Understanding the Dish Specifications
When we discuss the technical side of this baked ziti recipe, precision is our greatest ally. We are working with 450g (1 lb) of pasta and a carefully balanced ratio of 800ml (28 oz) of high-quality marinara.
The timing is non negotiable: a 20 minutes prep phase followed by exactly 40 minutes of total cooking time (stovetop and oven combined). This 60 minutes total investment yields 8 generous servings that retain their heat beautifully.
The oven must be preheated to 190°C (375°F). This specific temperature is high enough to create the "shatter" on the cheese topping while being gentle enough to prevent the edges of the pasta from becoming unpleasantly hard.
We are looking for a gentle simmer within the casserole dish, which allows the flavors to meld without breaking the emulsion of the cheese.
Selecting Your Gourmet Components
To achieve a master level result, the quality of your elements is paramount. We start with 450g of Ziti or Penne Rigate. If you can find ziti with ridges, it will hold the sauce even better.
You will also need 15g (1 tbsp) of Kosher salt for the pasta water remember, this is your only chance to season the pasta itself.
For the hearty meat sauce, we use 450g of Italian sausage with the casings removed. A small yellow onion and 3 cloves of fresh garlic provide the aromatic base. The 800ml of marinara should be the best you can find, or a homemade batch if time permits.
We also add 1/2 tsp of crushed red pepper flakes for a subtle, warming heat that cuts through the richness of the cheese.
The three cheese blend is the soul of the dish. You will need 425g (15 oz) of whole milk ricotta, 1 large egg, and 60g (1/2 cup) of freshly grated Parmesan. We finish with 450g of low moisture mozzarella. Unlike the Blueberry French Toast recipe which relies on a soft custard, our ziti needs the structural "tug" of high-quality mozzarella.
Essential Tools for Success
A heavy bottomed skillet is essential for browning the sausage. Cast iron or stainless steel is preferred over non stick, as we want to develop a "fond" those flavorful brown bits at the bottom of the pan. You will also need a large stockpot for the pasta and a medium mixing bowl for the ricotta mixture.
The final vessel should be a 9x13 inch ceramic or glass baking dish. Ceramic is particularly effective as it retains heat longer, keeping the ziti warm for the duration of a slow roasted dinner.
A fine mesh grater for the Parmesan is also a must to ensure the cheese melts into a lacy, delicate crust rather than heavy clumps.
Executing the Layering Process

- Heat a large skillet over medium high heat. Add the 450g of Italian sausage, breaking it into small crumbles. Cook until mahogany colored and no longer pink.
- Add the finely diced yellow onion and 3 cloves of minced garlic. Sauté for about 5 minutes until translucent and fragrant.
- Stir the 800ml of marinara sauce and red pepper flakes into the meat. Simmer on low for 10 minutes until the sauce thickens slightly. Note: If it looks too dry, a splash of pasta water works wonders.
- In a medium bowl, whisk the 425g of ricotta, the egg, 30g of the Parmesan, and 1/4 cup of chopped parsley. Stir in a small handful of the shredded mozzarella.
- Boil the ziti in salted water for 2 minutes less than the package directions. Drain and combine the pasta with the meat sauce in the stockpot until every tube is coated.
- Spread half of the saucy pasta into your 9x13 inch baking dish.
- Dollop the ricotta mixture evenly over the pasta layer to create pockets of creaminess.
- Cover with the remaining pasta and top with the rest of the mozzarella and Parmesan.
- Bake at 190°C (375°F) for 20-25 minutes until the cheese is golden brown and bubbling.
Solving Common Culinary Hurdles
Fixing a Dry Bake
If the pasta feels parched, it usually means the sauce was over reduced or the pasta was cooked too long before baking. The ziti acts as a sponge; if it's already fully hydrated, it won't absorb the sauce, but if the sauce is too thick, it can't penetrate the pasta.
Always err on the side of a slightly "soupy" sauce before it goes into the oven.
Preventing Greasy Toppings
A greasy surface is often the result of using low quality, high fat sausage or pre shredded cheese that leeches oil. To fix this, ensure you drain the excess fat from the skillet after browning the sausage but before adding the onions. This keeps the flavor without the oil slick.
| Problem | Root Cause | Solution |
|---|---|---|
| Rubbery Cheese | Overbaking or high heat | Tent with foil for the first 15 mins then uncover to brown |
| Watery Bottom | Ricotta was too wet | Drain ricotta in a sieve or use "Extra Heavy" ricotta varieties |
| Mushy Pasta | Boiling to full doneness | Subtract 2-3 minutes from the "Al Dente" package time |
Common Mistakes Checklist
- ✓ Never rinse the pasta after draining; the starch helps the sauce cling to the tubes.
- ✓ Do not skip the egg in the ricotta; it prevents the cheese from liquefying.
- ✓ Ensure the sausage is truly browned, not just grey, to unlock the deep savory notes.
- ✓ Let the dish rest for 5-10 minutes after baking to allow the layers to set.
- ✓ Use a block of mozzarella and grate it yourself for a superior, velvety melt.
Customizing Your Flavor Profile
Boosting the Spice
For those who prefer a more aggressive heat, double the red pepper flakes or add a tablespoon of Calabrian chili paste to the aromatics. This adds a fermented, fruity heat that pairs beautifully with the rich fats.
Creating a Vegetarian Version
You can easily swap the sausage for a mix of slow roasted mushrooms cremini and shiitake work best. Sauté them until they lose their moisture and become crispy to mimic the texture of the meat.
| Fresh Approach | Shortcut Method | Flavor Impact |
|---|---|---|
| Homemade Marinara | Jarred Premium Sauce | Homemade is brighter; jarred is more consistent and convenient |
| Fresh Sausage Links | Pre crumbled Meat | Links usually have better seasoning and higher quality fat |
| Fresh Herb Garnish | Dried Herbs in Sauce | Fresh parsley adds a necessary "high note" to the finish |
Adjusting the Recipe Volume
When scaling this baked ziti recipe down for two people, use an 8x8 inch pan and reduce the pasta to 225g. Interestingly, you should still use a whole egg for the ricotta mixture to maintain the structural bind, as half an egg is difficult to measure and provides less stability.
For a grand event, doubling the recipe requires two separate 9x13 inch pans rather than one giant deep one. This ensures the heat penetrates the center evenly. If you are making this alongside a protein like Baked Walleye, remember that the pasta will hold its heat much longer than the fish, so time your oven rotations accordingly.
Myths Regarding Baked Pasta
One common misconception is that the pasta needs to be "cooked through" before baking. This is the fastest way to ruin the texture. The oven is essentially a secondary cooking vessel; the pasta will continue to absorb liquid and soften as it bakes. If you start with soft pasta, you end with a soggy casserole.
Another myth is that "searing meat seals in juices." As many master cooks know, searing is about flavor development through the browning of proteins. The sausage doesn't stay juicier because of the crust; it simply tastes more complex. Finally, don't believe that you must cover the dish the entire time.
Leaving it uncovered for the final 10 minutes is what creates that signature gourmet crust.
Storage and Sustainability Habits
Storage: This dish is arguably better the next day. Keep leftovers in an airtight container in the fridge for up to 4 days. To reheat, add a tiny splash of water or extra sauce to the bowl and microwave, or bake at 175°C (350°F) covered with foil until heated through.
Freezing: You can freeze the assembled, unbaked ziti for up to 3 months. Wrap it tightly in plastic wrap and then foil. To bake from frozen, add an extra 20 minutes to the cook time and keep it covered for the first half of the process.
Zero Waste: Don't toss those parsley stems! Finely mince them and add them to the onion and garlic sauté; they contain intense flavor that holds up well to simmering. If you have leftover ricotta, it makes a wonderful base for a white pizza or can be sweetened with honey for a simple dessert.
Elegant Pairings for Dinner
Since this is a hearty, fat rich dish, it pairs best with elements that provide acidity and crunch. A simple arugula salad with a lemon shallot vinaigrette is the classic choice. The bitterness of the greens cuts through the creamy ricotta beautifully.
For a more formal presentation, serve alongside roasted broccolini finished with a squeeze of lemon and a dusting of red pepper flakes. The charred edges of the vegetables echo the browned cheese on the ziti, creating a cohesive, gourmet experience that feels like a special occasion even on a quiet Sunday evening.

CRITICAL (🚨) Sodium Alert
1145 mg 1145 mg of sodium per serving (50% 50% of daily value)
The American Heart Association recommends limiting sodium intake to 2,300 mg per day, with an ideal limit of 1,500 mg per day for most adults.
Actionable Sodium Reduction Tips for Your Pasta Bake
-
Choose Low-Sodium Marinara Sauce-20%
Select a low-sodium or no-salt added marinara sauce. This is a major source of sodium. Look for options specifically labeled as such.
-
Opt for Lower Sodium Cheeses-15%
Use reduced sodium ricotta and Parmesan cheeses. Shredding your own mozzarella from a block can also help as pre-shredded varieties often have anti caking agents containing sodium.
-
Select Lower Sodium Italian Sausage-15%
When purchasing Italian sausage, look for reduced sodium or 'no-added salt' varieties if available. Alternatively, consider making your own Italian seasoned ground meat from scratch.
-
Significantly Reduce Added Salt-25%
Cut the 1 tablespoon of Kosher salt used for boiling the pasta by at least half, or even omit it entirely. The salt in other ingredients will provide flavor.
-
Boost Flavor with Herbs and Spices
Enhance the taste of your dish with fresh and dried herbs like basil, oregano, thyme, and rosemary. Add garlic and onion for depth of flavor instead of relying on salt.
-
Control Red Pepper Flakes
While crushed red pepper flakes are typically low in sodium, ensure you are using pure flakes and not a seasoned blend that might contain salt.
Recipe FAQs
Should I cover my baked ziti when I put it in the oven?
No, keep it uncovered for the standard bake. Leaving the dish exposed allows the top layer of mozzarella and Parmesan to reach that signature golden brown, bubbly finish.
Do you bake ziti at 350 or 375?
Bake at 375°F. Following this specific temperature ensures the cheese melts perfectly and the flavors meld without drying out the pasta.
Can a diabetic eat ziti?
Consult your doctor regarding specific dietary needs. While this recipe includes protein from sausage and ricotta, it is high in carbohydrates, so portion control is essential.
Why does baked ziti need an egg?
The egg acts as a crucial binder. It prevents the ricotta from liquefying and turning grainy during the bake, ensuring the cheese filling maintains a smooth, stable structure.
How to keep the pasta from getting mushy?
Boil the ziti for 2 minutes less than the package instructions. The pasta will continue to cook in the sauce while in the oven, so starting with a firmer, al dente texture prevents it from becoming soft or overcooked.
Is it true I should rinse the pasta after boiling?
No, this is a common misconception. You must avoid rinsing the ziti because the residual starch on the surface is necessary to help the marinara sauce cling to the tubes.
How to serve this as part of a larger meal?
Pair this dish with a fresh green salad or crusty bread. If you enjoy creating a balanced, comforting spread, you might also like serving it alongside our garlic butter naan for an extra touch of hospitality.
Classic Baked Ziti
Ingredients:
Instructions:
Nutrition Facts:
| Calories | 702 kcal |
|---|---|
| Protein | 36.8 g |
| Fat | 37.1 g |
| Carbs | 56.4 g |
| Fiber | 3.8 g |
| Sugar | 6.2 g |
| Sodium | 1145 mg |
