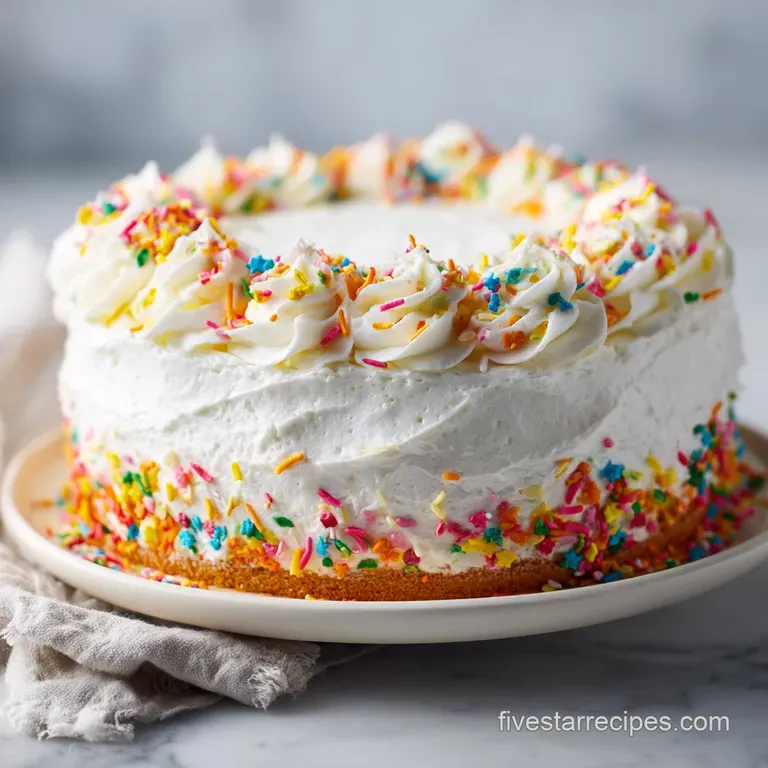
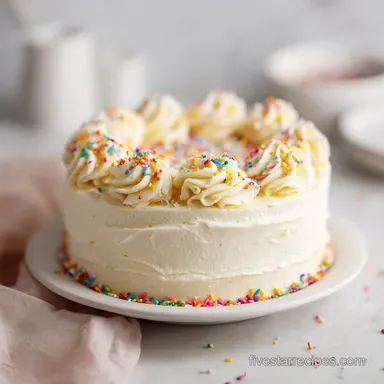
Vanilla Buttercream Frosting: Smooth and Stable
- Time: Active 15 minutes, Passive 0 minutes, Total 15 minutes
- Flavor/Texture Hook: Velvety, matte ivory finish with a balanced, non cloying sweetness
- Perfect for: High stakes birthday cakes, intricate pipe work, and gourmet cupcakes
- Achieving Professional Results With This Vanilla Buttercream Frosting Recipe
- Essential Statistics for a Five Star Batch
- The Scientific Logic Behind Your Sweet Components
- Professional Tools Required for a Velvety Finish
- Methodical Steps for Crafting the Perfect Emulsion
- Proactive Solutions for Common Texture and Consistency Failures
- Adapting the Recipe for Alternative Dietary Needs
- Preserving Freshness and Reducing Kitchen Food Waste
- Creative Applications and Flavor Pairing Suggestions
- Recipe FAQs
- 📝 Recipe Card
Achieving Professional Results With This Vanilla Buttercream Frosting Recipe
There is a specific sound that a stand mixer makes when it hits the three minute mark of creaming butter. It shifts from a heavy, rhythmic thud to a light, almost ethereal whir. I remember the exact moment I realized that temperature was the invisible ingredient in my kitchen.
I was preparing a cake for a friend's wedding, and the room was a stifling 80°F. My frosting was soup. No amount of sugar could save it; it just became a gritty, sweet puddle. That was the day I bought an instant read thermometer and started treating my butter like a lab specimen.
When you get this vanilla buttercream frosting recipe right, it doesn't just sit on a cake it protects it. The frosting creates a moisture barrier that keeps your sponge tender for days while providing that signature "shatter" when you first bite into a chilled slice.
We aren't just mixing ingredients here; we are building a stable emulsion of fat and sugar that can withstand the weight of multiple cake layers without bulging or weeping.
This approach is about moving away from "eyeballing it" and toward a repeatable, five star methodology. We want that pale ivory color that looks like expensive stationery, not the yellow hue of a stick of margarine.
By the time you finish this process, you will have a frosting that feels like silk on the tongue and holds a sharp edge with the precision of an architect's sketch. It is about the satisfaction of a perfectly smooth side scrape and the knowledge that your decorations won't slide off the cake before the candles are lit.
Essential Statistics for a Five Star Batch
Precision is the hallmark of a gourmet baker. To ensure your results match the professional standard, we have to look at the specific metrics of the bake. Small deviations in the temperature of your kitchen or the speed of your mixer can alter the final aeration level of the buttercream.
| Specification | Metric Value | Visual/Tactile Cue |
|---|---|---|
| Butter Temperature | 65°F (18°C) | Pliable but holds its shape; cool to the touch |
| Initial Creaming Time | 3 minutes | Pale ivory color with a matte, non greasy finish |
| Sugar Integration | 2 minutes | Sugar is fully dissolved into the fat matrix |
The difference between a "fast" frosting and a "classic" professional buttercream often comes down to the patience involved in the aeration phase. While it is tempting to dump all the sugar in at once, that is a recipe for a grainy texture that lacks structural integrity.
| Feature | Fast Method (Dump and Stir) | Classic Method (Precision Aeration) |
|---|---|---|
| Texture | Heavy, dense, and often grainy | Velvety, light, and perfectly smooth |
| Color | Yellowish and translucent | Opaque, pale ivory, and professional |
| Stability | Prone to weeping or sliding | Highly stable for piping and layering |
The Scientific Logic Behind Your Sweet Components
Understanding why we use specific ingredients at specific temperatures is the best way to prevent failure before it starts. This isn't just a list; it is a blueprint for a stable emulsion.
- Lipid Plasticity: At 65°F, butter exists in a state of plasticity where it is soft enough to deform but firm enough to trap air bubbles within its fat crystal network. If it is too warm, the bubbles collapse; if it is too cold, they never form.
- Sucrose Suspension: Sifting the confectioners' sugar is non negotiable. It ensures that the tiny particles of sugar are evenly distributed and immediately coated in fat, preventing the formation of "sugar clumps" that feel like sand.
- Mechanical Aeration: The 3 minute initial beat isn't just for mixing; it is for forcing air into the butter. This lightens the color and creates the "loft" required for a five star mouthfeel.
- Osmotic Balance: The inclusion of fine sea salt does more than season. It cuts through the heavy fat and sugar, brightening the vanilla notes and ensuring the frosting isn't "one note" sweet.
Ingredient Deep Dive
The quality of your components directly dictates the quality of the finish. Always use the highest grade of fat and flavoring available to you for this specific application.
| Ingredient | Science Role | Pro Secret |
|---|---|---|
| Unsalted Butter | The structural fat base | Use a high fat European style butter for a richer mouthfeel |
| Confectioners' Sugar | The bulking agent and sweetener | Always sift after weighing to ensure maximum aeration |
| Heavy Cream | The emulsifying liquid | Cold cream helps stabilize the fat if the butter starts to warm |
- 226g unsalted butter, pliable (65°F)
- Why this? Provides the structural foundation and essential creamy mouthfeel for the entire recipe.
- 510g confectioners’ sugar, sifted
- Why this? Creates the volume and sweetness while maintaining a smooth, non gritty texture.
- 15ml pure vanilla extract
- Why this? high-quality extract provides complex aromatic notes that artificial flavors lack.
- 38ml heavy whipping cream
- Why this? Adds moisture and fat to create a silky, spreadable consistency.
- 1.5g fine sea salt
- Why this? Sharpens the flavor profile and balances the intense sweetness of the sugar.
Professional Tools Required for a Velvety Finish
To achieve a five star result, you need the right mechanical advantage. While you could technically make this with a hand mixer, a stand mixer provides the consistent torque and speed necessary for proper aeration without overheating the motor or the frosting.
The paddle attachment is your best friend here. Unlike the whisk, which incorporates too much air and creates large, unsightly bubbles, the paddle "massages" the ingredients together. It creates a dense but light texture that is ideal for a smooth finish on a cake. If you are looking for a base to pair this with, the dense crumb of a Sour Cream Coffee Cake works beautifully, though you should skip the streusel topping if you plan on full coverage frosting.
An offset spatula and a bench scraper are also essential for the final application. These tools allow you to manipulate the frosting without the heat from your hands affecting the stability of the butter.
I always keep a bowl of warm water nearby to dip my scraper into; the slight heat helps "melt" the very surface of the frosting as you smooth it, resulting in a glass like finish.
Methodical Steps for Crafting the Perfect Emulsion

Follow these steps with precision. The timing and visual cues are more important than the clock itself, as kitchen temperatures can vary.
- Prepare the Butter. Place 226g of pliable, 65°F unsalted butter into the bowl of a stand mixer. Ensure the butter is cool to the touch but leaves an indentation when pressed.
- Aerate the Base. Fit the mixer with the paddle attachment and beat on medium speed for 3 minutes. Stop when the butter turns pale ivory and has a matte finish.
- Sift the Sweetener. While the butter creams, sift all 510g of confectioners' sugar through a fine mesh sieve to remove any compacted lumps.
- Gradual Sugar Integration. Turn the mixer to the lowest setting. Add the sugar one cup at a time, allowing it to incorporate before adding the next batch.
- Develop the Emulsion. Once the sugar is in, increase the speed to medium and beat for 2 minutes. The mixture should look uniform and feel smooth between your fingers.
- Incorporate Liquids. Add 15ml pure vanilla extract, 38ml heavy whipping cream, and 1.5g fine sea salt.
- The Final Smoothing. Beat on low speed until the liquids are fully absorbed. Note: Using a low speed at the end prevents large air pockets from forming.
- Evaluate Consistency. Stop the mixer and stir by hand with a rubber spatula for 30 seconds to knock out any remaining air bubbles. The frosting should be velvety and thick enough to hold a stiff peak.
Chef's Tip: If your kitchen is warm, freeze your mixer bowl for 10 minutes before starting. This helps the butter stay in that crucial 65°F zone during the long aeration phase.
Proactive Solutions for Common Texture and Consistency Failures
Most buttercream issues are related to temperature or the ratio of liquid to fat. If something goes wrong, it's usually a simple fix involving a change in thermal energy.
Fixing Grainy Texture Issues
If your frosting feels like sand, the sugar hasn't properly integrated with the fat. This often happens if the butter was too cold or the sugar wasn't sifted. To fix this, continue beating on medium speed for another 2 to 3 minutes.
The friction of the paddle will generate a tiny amount of heat, helping the sugar crystals dissolve into the moisture present in the butter and cream.
Preventing Soft or Melting Frosting
If the frosting is too soft to hold a shape, the butter has likely passed the 70°F mark and is beginning to lose its crystalline structure. Place the entire bowl in the fridge for 15 minutes, then re whip. This "resets" the fat. Just like the delicate balance of a Vanilla Panna Cotta, temperature is the primary factor in how well a dessert sets.
Eliminating Large Air Pockets
Large bubbles (or "pockmarks") in your frosting are caused by over whipping on high speed or using a whisk attachment. To fix this, use a heavy wooden spoon or a stiff rubber spatula to "smush" the frosting against the sides of the bowl for several minutes.
This manual labor forces the air out, leaving you with a dense, silky finish.
| Problem | Root Cause | Solution |
|---|---|---|
| Separating/Curdling | Temperature shock from cold cream | Warm the bowl slightly with a hair dryer while mixing |
| Yellow Tint | Under creaming the butter | Beat the butter alone for a full 3 minutes before adding sugar |
| Too Sweet | Lack of acid or salt balance | Add an extra pinch of salt or a drop of lemon juice |
Common Mistakes Checklist:
- ✓ Never use "melted and re solidified" butter; the crystal structure is permanently altered.
- ✓ Always sift your sugar, even if it looks fine in the bag.
- ✓ Stop the mixer and scrape the bottom of the bowl twice to ensure no butter streaks remain.
- ✓ Check your butter temperature with a thermometer — 65°F is the hard rule for success.
- ✓ Avoid using "imitation" vanilla, which can add a chemical bitter aftertaste to the fat.
Adapting the Recipe for Alternative Dietary Needs
While the classic version relies on dairy fat and cane sugar, you can modify it for various needs. Keep in mind that any change to the fat source will significantly alter the melting point and stability of the frosting.
| Original Ingredient | Substitute | Why It Works |
|---|---|---|
| Unsalted Butter | high-quality Vegan Butter Sticks | Similar fat to water ratio. Note: Often has a lower melting point than dairy butter. |
| Heavy Cream | Full fat Coconut Milk | Provides necessary fat and liquid for emulsion. Note: Adds a slight tropical flavor. |
| Confectioners' Sugar | Powdered Monk Fruit | Provides sweetness without the glycemic load. Note: Can have a cooling aftertaste. |
When scaling this recipe down for a small batch (e.g., 6 cupcakes), simply divide all ingredients by four. For a 2x or 3x batch, be careful with the salt and vanilla; start with 1.5x the amount and taste before adding the full scaled amount.
The volume of sugar in a triple batch can also overwhelm a standard 5 quart mixer, so work in batches if necessary to maintain proper aeration.
Decision Shortcut
- If you want a whiter frosting: Add a tiny drop of violet food coloring to neutralize the yellow tones of the butter.
- If you want a firmer frosting: Replace half of the butter with high-quality vegetable shortening (though flavor will be slightly diluted).
- If you want a "crusting" buttercream: Reduce the heavy cream by half and increase the sugar by 50g.
Preserving Freshness and Reducing Kitchen Food Waste
Proper storage is the difference between a fresh tasting cake and one that tastes like "fridge air." Buttercream is highly porous and will absorb odors from onions or leftovers if not sealed correctly.
Storage Guidelines:Refrigerator: Store in an airtight container for up to 7 days. You must re whip it before using, as it will become rock hard when cold. Freezer: Freeze for up to 3 months in a heavy duty freezer bag with all air squeezed out.
Thaw overnight in the fridge, then bring to room temperature before re whipping.
Zero Waste Tips: If you find yourself with a cup of leftover frosting, don't throw it away. It can be transformed into "cake truffles" by mixing it with cake scraps or crushed cookies.
Alternatively, use it as a filling for sandwich cookies or even stir a spoonful into your morning oatmeal for a decadent treat. The butter and sugar act as a preservative, so as long as it's kept cold, it has a surprisingly long shelf life.
Creative Applications and Flavor Pairing Suggestions
This vanilla buttercream frosting recipe is essentially a blank canvas. While it is perfect on its own, it can be the foundation for dozens of other flavors.
One myth that needs debunking is that you should always use clear vanilla to keep the frosting white. In reality, clear vanilla is artificial and lacks the depth of the real bean. If you want a pure white finish, it is better to use real vanilla and the violet coloring trick mentioned earlier.
Another myth is that more sugar makes a "stiffer" frosting. While true to a point, too much sugar actually makes the frosting heavy and prone to sagging under its own weight. Stability comes from the aeration of the fat, not just the volume of the sugar.
For a wedding classic feel, pair this with a traditional white almond cake. For a dark contrast, use it to top a deep, Dutch processed chocolate cake where the vanilla can truly shine against the bitterness of the cocoa.
You can also fold in crushed freeze dried strawberries for a natural pink hue and a punchy, tart flavor that cuts through the richness of the butter. Whatever you choose, remember that the precision you put into the mixing bowl will show in every velvety bite.

Recipe FAQs
How to make the best vanilla buttercream?
Beat your 65°F butter for exactly 3 minutes on medium speed until it reaches a pale ivory, matte finish before adding any other ingredients. This aeration process creates the foundation for a professional, stable structure.
What is the secret to good buttercream frosting?
Emulsification is the primary key. After adding your sifted confectioners' sugar on low, increase the mixer to medium for 2 minutes to force the sugar and fat to bind into a velvet smooth consistency. If you enjoyed mastering this emulsion technique, see how we apply similar stability logic in our chocolate peanut butter pie.
What are common buttercream mistakes?
Using butter that is too warm or failing to sift the confectioners' sugar are the most frequent errors. Butter must be 65°F to hold structure, and unsifted sugar will inevitably lead to a gritty, uneven texture in your final frosting.
Is it true that I can use melted butter to save time?
No, this is a common misconception. You must use pliable, 65°F butter; melted butter cannot hold the necessary air pockets, resulting in a thin, soupy liquid rather than a fluffy frosting.
What is the difference between vanilla frosting and buttercream?
Buttercream is defined by its high fat-to-sugar ratio and aeration, whereas generic vanilla frosting often relies on shortening or water based syrups. By using 226g of butter and 38ml of heavy whipping cream, you achieve a much richer mouthfeel and stable structure than standard store-bought toppings.
How to fix frosting that feels too stiff?
Add an additional teaspoon of heavy whipping cream and beat on low speed until incorporated. Continue adjusting in small, controlled increments until you reach the desired velvet smooth consistency.
How to store leftover buttercream?
Keep in an airtight container in the refrigerator for up to one week. When you are ready to use it again, bring the frosting to room temperature and re-whip it briefly to restore the original, airy texture.
Vanilla Buttercream Frosting Recipe
Ingredients:
Instructions:
Nutrition Facts:
| Calories | 157 kcal |
|---|---|
| Protein | 0.1 g |
| Fat | 8.2 g |
| Carbs | 21.3 g |
| Sugar | 21.3 g |
| Sodium | 24 mg |
