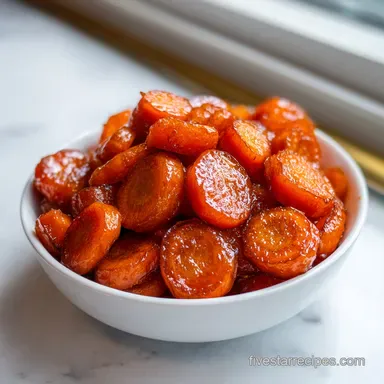
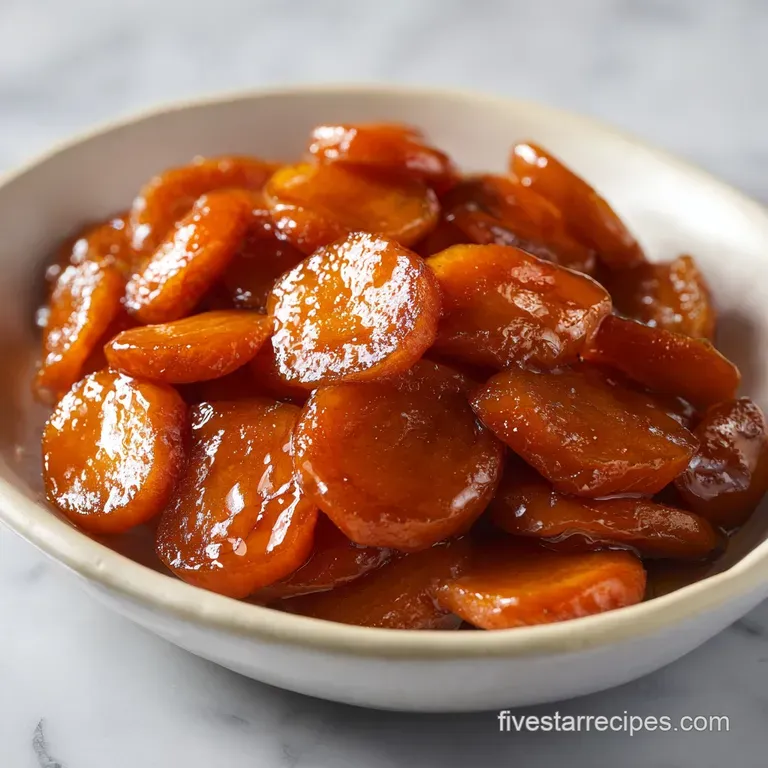
Brown Sugar Glazed Carrots: Velvety and Glossy
- Time: 5 min active + 15 min cook = Total 20 min
- Flavor/Texture Hook: Velvety, glossy, and deeply caramelized
- Perfect for: Holiday dinners, Sunday roasts, or an impressive side for guests
- Perfect Brown Sugar Glazed Carrots
- Secrets To Glossy Roots
- Essential Ingredient Guide
- Must Have Kitchen Tools
- Step By Step Cooking
- Fixing Common Glaze Issues
- Troubleshooting Common Issues
- Creative Flavor Variations
- Adjusting Portion Sizes
- Root Vegetable Truths
- Preservation And Reheating
- Perfect Pairing Suggestions
- Recipe FAQs
- 📝 Recipe Card
The scent of bubbling brown sugar hitting foaming butter is the official signal that dinner has transitioned from a weekday meal to a gourmet event. It is that warm, toasted aroma that fills the kitchen and makes everyone lean in.
I remember a particular Christmas dinner a few years back when I spent hours on a complex roast, but the only thing my guests actually raved about were the carrots.
They looked like little polished amber gemstones on the platter. I had spent a long time trying to get that specific, high gloss look you see in restaurant dishes, and it finally clicked when I realized the importance of the water to sugar ratio.
Instead of just tossing them in sugar, creating a quick syrup in the pan ensures a smooth, mirror like coating.
This recipe for brown sugar glazed carrots is designed for those moments when you want a side dish that feels intentional and sophisticated. We aren't just boiling vegetables here, we are building a glaze that balances the natural earthiness of the root with a rich, buttery sweetness.
It is simple, but the results are strikingly elegant.
Perfect Brown Sugar Glazed Carrots
The key to this dish is the transition from sautéing to glazing. By browning the carrots in butter first, you develop a savory base that prevents the dish from tasting like candy.
Once the sugar and water are added, the liquid reduces, concentrating the flavors and creating a thick, velvety syrup that wraps around each piece.
Trust me, don't skip the sauté step. If you just simmer the carrots in the glaze from the start, they'll be tender, but they'll lack that deep, caramelized character. Those golden edges are where the real flavor lives. It turns a standard vegetable into something that feels like a treat.
Whether you are using heirloom carrots or the convenient baby variety, the technique remains the same. The goal is a consistent coin size so that every piece reaches the same level of tenderness at the exact same moment.
Secrets To Glossy Roots
Since we're aiming for a gourmet finish, we need to understand what's happening in the pan. It is not magic, just a few simple reactions that make the glaze stick.
The Sugar Bridge: Adding a splash of water allows the brown sugar to dissolve completely before it starts to caramelize. This prevents "sugar clumps" and ensures a smooth, uniform coating.
Butter Emulsion: The fat in the butter blends with the melted sugar and the carrots' natural juices. This creates a stable emulsion that gives the glaze its signature velvet texture.
Controlled Evaporation: As the water evaporates, the sugar concentration increases. This is what transforms a thin liquid into a thick, mahogany syrup that clings to the vegetable rather than pooling at the bottom of the plate.
Tenderization: The sugar and salt act as gentle seasonings that draw a bit of moisture out of the carrots, which then mixes with the butter to create a self basting environment.
| Method | Time | Texture | Best For |
|---|---|---|---|
| Stovetop | 20 min | Velvety & Glossy | Fast, high impact dinners |
| Oven Roast | 40 min | Tender & Charred | Large crowds / hands off |
| Air Fryer | 15 min | Slightly Crispy | Small batches / quick sides |
Essential Ingredient Guide
Getting the right components is half the battle. I always suggest using unsalted butter so you can control the seasoning precisely, especially since brown sugar can vary in its molasses content.
| Ingredient | Science Role | Pro Secret |
|---|---|---|
| Unsalted Butter | Fat Base | Use European style butter for a richer, creamier glaze |
| Brown Sugar | Glaze Agent | Packed light brown sugar gives the best color without being too bitter |
| Carrots | Structural Base | Slice into 1 inch coins for a consistent "bite" |
| Water | Solvent | Precisely 1 tbsp prevents the sugar from burning too quickly |
Choosing a high-quality butter with a higher fat content, as discussed by experts at Serious Eats, helps create a more stable emulsion for the glaze.
Must Have Kitchen Tools
You don't need a professional kitchen, but a few specific tools make this process much smoother.
- 12 inch Heavy Bottomed Skillet: This is non negotiable. A thin pan will create "hot spots" that burn the sugar while the carrots stay raw. Cast iron or stainless steel works best.
- Vegetable Peeler: For a clean, professional look, peel the carrots thoroughly. Any remaining skin can look rustic, but for a gourmet presentation, we want them smooth.
- Silicone Spatula: Great for scraping every bit of that mahogany glaze from the sides of the pan back onto the carrots.
Chef Note: If you only have a small pan, work in batches. Crowding the pan steams the carrots instead of sautéing them, which means you'll lose those golden brown edges.
Step by step Cooking
Let's get into it. Follow these steps closely, and pay attention to the visual cues.
- Prepare the roots. Peel the carrots and slice them into consistent 1 inch rounds. Note: Uniform thickness means uniform cooking.
- Heat the fat. Melt 2 tbsp unsalted butter in your 12 inch skillet over medium high heat until it begins to foam.
- Sear the carrots. Add the carrots in a single layer. Sauté for 5-7 minutes, stirring occasionally, until the edges turn golden brown.
- Season the pan. Sprinkle 3 tbsp packed light brown sugar, 1/4 tsp salt, and 1/8 tsp black pepper evenly over the carrots.
- Deglaze. Pour in 1 tbsp water. Note: This helps the sugar melt without scorching.
- Reduce the glaze. Stir constantly for 3-5 minutes until the liquid bubbles into a thick, mahogany colored syrup.
- Check tenderness. Pierce a carrot with a fork. Remove from heat once they are tender but still have a slight "snap" to them.
- Final touch. Garnish with 1 tsp fresh chopped parsley. The green pop against the amber glaze is what makes this dish look professional.
Fixing Common Glaze Issues

Even the best cooks hit a snag occasionally. Usually, it comes down to heat management or liquid ratios.
Troubleshooting Common Issues
| Issue | Solution |
|---|---|
| Why Your Glaze Is Watery | If your carrots are swimming in liquid, you likely didn't let the sauce reduce enough. The water is there to help the sugar melt, but it must evaporate for the glaze to thicken. Keep stirring over med |
| Why Your Sugar Burnt | Burnt sugar happens when the heat is too high or the water was skipped. If you smell something acrid or see black specks, you can't "un burn" it. You'll need to wipe the pan and start over, ensuring t |
| Why Your Carrots Are Mushy | Overcooking is the enemy here. If you sauté them too long before adding the sugar, or simmer them too long in the glaze, they lose their structure. Always pull them off the heat while they still have |
Success Checklist:
- ✓ Carrots are sliced to a uniform 1 inch thickness
- ✓ Butter is foaming before carrots are added
- ✓ Single layer in the pan (no crowding)
- ✓ Glaze is stirred constantly during the final 5 minutes
- ✓ Carrots removed while still slightly firm
Creative Flavor Variations
Once you've mastered the classic version, you can start playing with the flavor profile. These brown sugar glazed carrots are a great canvas for other gourmet additions.
The Savory Twist: Add a pinch of ground ginger or a teaspoon of orange zest during the glazing step. The citrus cuts through the richness of the butter and sugar, making it feel lighter and more modern.
The Holiday Spice: A pinch of cinnamon or a dash of nutmeg transforms this into a quintessential Christmas side. If you're planning a full holiday feast, this side pairs beautifully as a precursor to a warm apple crisp for dessert.
The Vegan Option: Swap the butter for a high-quality vegan butter stick (not the tub kind). The result is almost identical, though you may need to add a tiny pinch more salt to mimic the richness of dairy.
The Honey Blend: Replace 1 tbsp of the brown sugar with 1 tbsp of honey. This creates a more floral sweetness and an even higher gloss.
Adjusting Portion Sizes
If you're cooking for a crowd or just yourself, you can't always just double everything. Some things don't scale linearly.
Cutting it in half: Use a smaller skillet (8-10 inches). Reduce the cooking time by about 20% because the carrots will heat through faster in a smaller mass. Use 1 egg white or a splash of water if the sauce seems too thick.
Doubling or Tripling: Do not use one pan unless it is massive. Work in batches. If you crowd the pan, the carrots will release too much moisture and steam, meaning you'll never get that golden sear. Keep the salt and pepper at 1.5x instead of 2x to avoid over seasoning.
Oven Method for Large Groups: For 3 lbs of carrots or more, toss them in melted butter and sugar, then spread them on a sheet pan. Bake at 400°F (200°C) for 20-25 minutes, tossing halfway through.
You won't get the same velvety glaze as the stovetop, but it's more efficient.
Root Vegetable Truths
There are a few things people tell you about cooking carrots that simply aren't true. Let's clear those up.
The Boiling Myth: Some say you must parboil carrots before glazing them to ensure they're cooked through. This is a mistake. Boiling leaches out the flavor and makes them waterlogged. Sautéing them directly in butter preserves the nutrients and concentrates the taste.
The "Baby Carrot" Lie: Many believe baby carrots are "healthier" or "better" for glazing. In reality, they are often just larger carrots cut down by machines. Real, whole carrots peeled by hand often have a more complex, sweet flavor profile.
Preservation And Reheating
Since this is an occasion ready dish, you might want to prep it in advance. However, sugar and butter can be finicky when they cool down.
Fridge Storage: Store leftovers in an airtight container for 3-5 days. The glaze will solidify and look matte, but it will return to its glossy state once heated.
Freezing: I don't recommend freezing this dish. The cell structure of the carrots breaks down, and the glaze can separate, leaving you with a watery mess.
Reheating Tips: Avoid the microwave if possible, as it can make the carrots mushy. Instead, place them in a small skillet over medium low heat. Add a teaspoon of water or a small knob of butter to loosen the glaze. Stir gently until they are heated through and the syrup is velvety again. When prepping for a big party, you can make these and then move on to other treats, like a silky panna cotta, which can sit in the fridge for hours.
Perfect Pairing Suggestions
These brown sugar glazed carrots are rich and sweet, so you want to pair them with something that provides a savory or acidic contrast.
With Proteins: They are a match made in heaven for roasted pork loin, herb crusted chicken, or a slow roasted prime rib. The sweetness of the carrots complements the saltiness of a well seared meat.
With Starches: Serve them alongside a garlic mashed potato or a wild rice pilaf. The earthy tones of the rice help ground the sweetness of the glaze.
The Plating Secret: To make the dish look truly gourmet, pile the carrots high in the center of a white platter. Drizzle any remaining syrup from the pan over the top and finish with a fresh sprinkle of parsley.
It creates a professional, high contrast look that makes the meal feel like a special occasion.
Recipe FAQs
Can you caramelize carrots with brown sugar?
Yes, this occurs during the final stirring phase. As the brown sugar melts with the water, it creates a mahogany syrup that caramelizes the carrots' natural sugars.
What are some common mistakes to avoid when making glazed carrots?
Avoid overcrowding the pan and overcooking the roots. Sautéing in a single layer ensures the edges brown instead of steaming, while stopping once they are fork tender prevents a mushy texture.
What gives glazed carrots a glossy look?
The emulsification of melted butter and reduced sugar syrup. As water evaporates, the fat and sugar bind to create a velvety coating. If you enjoyed mastering this glaze technique here, see how the same principle works in our crack green beans.
How do you make Amish glazed carrots?
Sauté sliced carrots in foaming butter over medium high heat. Once browned, stir in brown sugar, salt, pepper, and water for 3-5 minutes until the glaze thickens into a syrup.
Why is my glaze watery instead of thick?
The sauce likely didn't reduce enough. Continue stirring over medium high heat to allow the water to evaporate, which concentrates the sugar into a thick glaze.
Why did my brown sugar burn in the pan?
The heat was likely too high or the water was omitted. Without water to dissolve the sugar evenly, crystals can scorch quickly, resulting in an acrid taste.
Do the carrots have to be sliced into 1 inch rounds?
Yes, for consistent cooking. Uniform thickness ensures every coin reaches fork tender doneness at the exact same time without some pieces remaining raw.
Brown Sugar Glazed Carrots