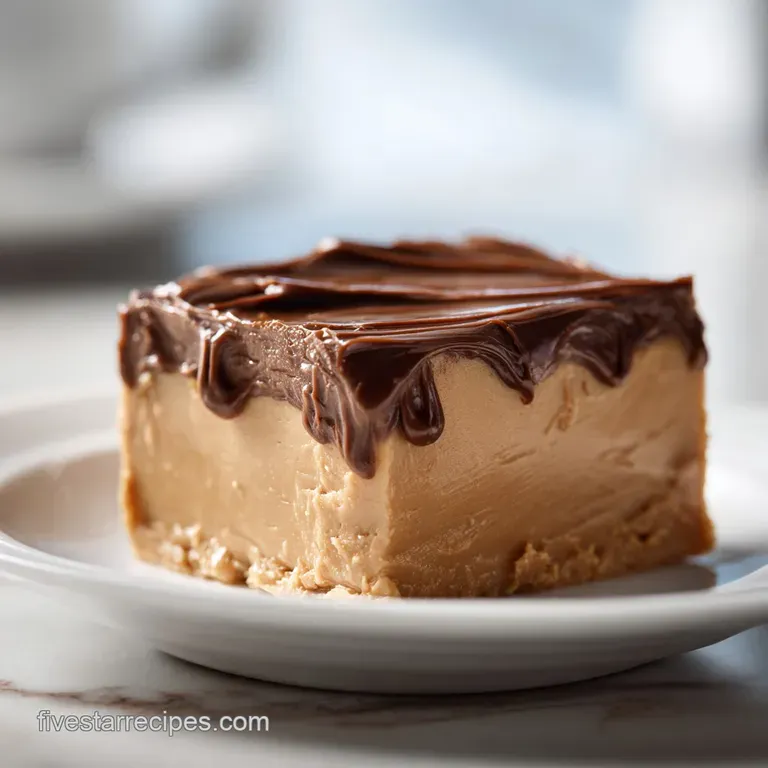
Peanut Butter Fudge: Velvety & Fast
- Time: Active 5 minutes, Passive 5 minutes, Total 10 minutes
- Flavor/Texture Hook: Deeply nutty and buttery with a luxurious, melt away velvety finish.
- Perfect for: Holiday gifting, last minute dessert cravings, or beginner friendly confectionery.
- Mastering the Silky Consistency of Peanut Butter Fudge
- Critical Technical Specifications for This Five Star Batch
- Sourcing high-quality Elements for a Luxurious Melt
- Essential Kitchen Tools Required for Professional Result Precision
- Detailed Steps to Construct the Ultimate Fudgy Base
- Solving Common Texture Issues and Structural Failures
- Creative Flavor Modifications and Smart Ingredient Swaps
- Proper Preservation and long-term Storage Solutions
- Elegant Serving Suggestions and Gourmet Gifting Tips
- Recipe FAQs
- 📝 Recipe Card
Mastering the Silky Consistency of Peanut Butter Fudge
The first time I tried to make peanut butter fudge, the kitchen smelled like a dream toasted nuts and melting butter but the result was a gritty, crumbling mess that looked more like damp sand than a five star dessert.
I remember standing over the counter, staring at the oily separation, wondering how four simple ingredients could betray me so thoroughly. It was a humbling moment for a home cook who thought she’d mastered the basics, but it forced me to stop guessing and start looking at the actual physics of the melt.
After months of tweaking ratios and testing different temperatures, I realized that the secret isn't in the brand of peanut butter or a fancy copper pot. It is entirely about the emulsion.
When you get that butter and peanut butter to marry perfectly before the sugar ever hits the bowl, the result is a velvety slab that holds its shape with a clean, sharp edge. Now, every time I peel back the parchment paper, that initial nutty aroma hits me, and I know exactly what to expect: a smooth, dense square that feels like silk.
We’re going to walk through exactly how to make peanut butter fudge so you never have to deal with a "greasy top" or a "sandpaper bite" ever again. This isn't just about mixing things in a bowl; it’s about understanding why we do it in this specific order.
Trust me, once you see how easy it is to get that professional finish at home, you’ll never look at store-bought fudge the same way. Let’s get the butter melting.
Critical Technical Specifications for This Five Star Batch
Suspension Stability: By pre melting the lipids (butter and peanut butter), we create a warm, fluid environment where the sugar crystals can be completely coated, preventing them from re bonding into large, gritty clumps.
Saturated Fat Control: Using unsalted butter allows for precise control over the moisture to fat ratio, ensuring the fudge sets into a firm, sliceable structure rather than a soft spread.
Hygroscopic Balance: Powdered sugar acts as a stabilizer, absorbing the minimal moisture in the butter to create a dense, non porous crumb that resists melting at room temperature.
Achieving the Perfect Emulsion
The goal here is a unified liquid phase. When you melt the butter and peanut butter together, you are creating a stable base that can support the heavy load of powdered sugar. If these aren't fully integrated, the oil will leach out during the cooling process, leaving you with a slick surface.
Eliminating Powdered Sugar Grittiness
Texture is the difference between mediocre and gourmet fudge. Sifting your sugar is not an optional "extra" step; it is the fundamental way we ensure every microscopic particle is surrounded by fat, resulting in that signature velvety mouthfeel.
Maximizing Flavor Without Evaporated Milk
Many traditional recipes rely on evaporated milk and long boil times, but we are using vanilla and sea salt to provide depth. This method preserves the bright, roasted notes of the peanut butter rather than masking them with the heavy "cooked" taste of caramelized milk.
| Method | Time | Texture | Best For |
|---|---|---|---|
| Stovetop | 5 minutes | Ultra smooth and glossy | Maximum control and even heat distribution |
| Microwave | 2 minutes | Soft and slightly aerated | Quick fixes when you need a treat fast |
| Double Boiler | 8 minutes | Very delicate, prevents scorching | Beginners who worry about burning the fats |
Using the stovetop is generally the gold standard because you can visually confirm when the fats have emulsified. If you choose the microwave, do it in 30 second bursts to avoid "breaking" the peanut butter, which can happen if it gets too hot too quickly.
Sourcing high-quality Elements for a Luxurious Melt
To make peanut butter fudge that truly stands out, you need to be picky about your pantry. We aren't just throwing things in a pot; we are selecting components that complement each other.
For example, using a high-quality vanilla extract (not the imitation stuff) provides an aromatic bridge between the salt and the sugar that makes the whole dish feel more sophisticated.
- 1 cup (225g) Unsalted Butter: Provides the structural fat and a rich, creamy backbone.
- 1 cup (250g) Creamy Peanut Butter: Use a standard commercial brand (like Jif or Skippy) rather than "natural" oil on-top varieties for the most stable set.
- 1 pound (450g) Powdered Sugar: This provides the sweetness and the body of the fudge. Why this? The cornstarch in powdered sugar helps stabilize the fudge and keeps it from weeping.
- 1 tablespoon Pure Vanilla Extract: Adds a floral, complex aroma that cuts through the heavy fat.
- 0.5 teaspoon Sea Salt: This is the "flavor waker." It balances the sugar so the fudge doesn't taste cloying.
| Ingredient | Science Role | Pro Secret |
|---|---|---|
| Unsalted Butter | Structural Lipid | Freeze for 5 mins before melting to slow the water evaporation. |
| Creamy Peanut Butter | Protein/Fat Matrix | Use room temp PB to prevent the butter from seizing during mixing. |
| Powdered Sugar | Bulk and Stability | Always sift directly into the pot to keep the fudge from becoming "sandy." |
Essential Kitchen Tools Required for Professional Result Precision
You don't need a lab, but a few specific items will make your life much easier. I always suggest using a heavy bottomed saucepan. Thin pots have "hot spots" that can scorch the bottom of your peanut butter before the rest is even warm.
If you’ve ever tasted burnt peanut butter, you know it’s a flavor that ruins everything it touches.
You will also need an 8x8 inch (20x20cm) square pan. If you use a larger pan, your fudge will be thin and lose that satisfying "bite." If you use a smaller one, it becomes a thick brick that’s hard to eat. Line the pan with parchment paper, leaving an overhang on the sides.
This "sling" is how you’ll lift the chilled fudge out later without having to dig it out with a knife.
Finally,, grab a sturdy silicone spatula. Wooden spoons are great, but silicone allows you to scrape every last bit of that velvety mixture off the sides of the pot. We don't want to leave any of that liquid gold behind. Similar to the technique used in our Peanut Butter Cookies recipe, consistency in mixing is what separates a home cook from a pro.
Detailed Steps to Construct the Ultimate Fudgy Base
Preparing the Setting Vessel
Line an 8x8 inch pan with parchment paper. Note: This ensures you can lift the entire block out for clean, square cuts later.
Melting the Fat Foundation
Combine the 1 cup (225g) unsalted butter and 1 cup (250g) creamy peanut butter in a medium saucepan. Cook over medium low heat until the mixture is completely liquid and glossy. Note: Do not let it boil; we just want a uniform emulsion.
The Aroma and Texture Profile
Remove the pan from the heat immediately. Stir in the 1 tablespoon pure vanilla extract and 0.5 teaspoon sea salt. Watch for the slight sizzle as the alcohol in the vanilla evaporates.
Incorporating the Dry Volume
Add the 1 pound (450g) powdered sugar to the pot. Stir with a heavy spatula until no white streaks remain and the mixture is stiff. Note: It will look like it won't come together at first, but keep folding; the heat from the fats will eventually absorb the sugar.
Compacting and Chilling Steps
Transfer the mixture into your prepared pan. Press down firmly with the back of a spoon or a piece of waxed paper until the surface is flat and even.
Final Setting Phase
Let the pan sit on the counter for 15 minutes, then move it to the refrigerator. Chill for at least 1 hours until the center is firm to the touch.
The Clean Slice
Lift the fudge out using the parchment sling. Use a long, sharp knife dipped in hot water to cut into 25 equal squares. Expect the knife to glide through like butter.
Solving Common Texture Issues and Structural Failures
One of the biggest heartbreaks is spending time on a recipe only to have it turn out oily. "Oily top syndrome" usually happens because the peanut butter got too hot and the natural oils separated from the solids. If you see oil pooling on top while it's in the pan, don't panic.
You can often blot it gently with a paper towel before it sets, but the real fix is preventing it by keeping your heat on low.
Why Your Fudge Is Gritty
Grittiness is almost always caused by the powdered sugar not being fully incorporated or by using sugar that has picked up moisture from the air and formed tiny, hard clumps. Even if the sugar looks fine in the bag, the friction of the "shatter" when you pour it can create static that keeps clumps together.
Always sift.
| Problem | Root Cause | Solution |
|---|---|---|
| Fudge won't set | Too much butter or under measured sugar | Add 1/4 cup extra sugar and re press into the pan. |
| Crumbly texture | Mixture was over stirred after adding sugar | Fold gently; don't "beat" the mixture once the sugar is in. |
| Greasy surface | High heat caused the peanut butter to break | Keep heat at medium low and remove once melted. |
Common Mistakes Checklist
- ✓ Never use "Natural" peanut butter with oil on top (it lacks the stabilizers needed for this specific set).
- ✓ Sift the powdered sugar even if it looks smooth (micro clumps are the enemy of velvety fudge).
- ✓ Do not boil the butter and peanut butter (excessive heat ruins the emulsion).
- ✓ Let the fudge cool at room temperature for a few minutes before putting it in the fridge to prevent condensation.
- ✓ Use a hot knife for slicing to get those crisp, five star edges.
Creative Flavor Modifications and Smart Ingredient Swaps
If you're looking to change things up, this base is incredibly forgiving. I once tried adding a handful of crushed pretzels to the mix, and the "crunch" against the "velvety" base was a total revelation. You can also play with the fats if you have dietary restrictions, though the texture will shift slightly.
For a deeper flavor, try using a dark roasted peanut butter. It adds a smoky note that pairs beautifully with the salt. If you want to get really fancy, you could even make this as a layer in a larger dessert spread. It works wonderfully alongside a Peanut Butter Icing Recipe if you're building a multi textured peanut butter cake.
| Original Ingredient | Substitute | Why It Works |
|---|---|---|
| Unsalted Butter (1 cup) | Virgin Coconut Oil (1 cup) | Stays solid at room temp. Note: Adds a distinct tropical flavor. |
| Powdered Sugar (1 lb) | Swerve Confectioners | Maintains the bulk and texture without the glycemic load. |
| Creamy Peanut Butter | Almond Butter | Similar fat content. Note: Result will be slightly more "toffee like" in flavor. |
Adding a Textural Crunch
If you prefer a bit of a bite, swap the creamy peanut butter for extra crunchy. The pieces of roasted peanuts provide a fantastic contrast to the soft fudge. You can also fold in 1/2 cup of chopped roasted peanuts at the very end.
Making it dairy-free
To make this vegan friendly, use a high-quality plant based butter stick (not the tub margarine). Look for one with a high saturated fat content to ensure the fudge sets properly. Coconut oil works in a pinch, but the fudge will melt much faster in your hands.
Proper Preservation and long term Storage Solutions
Peanut butter fudge is surprisingly hardy. Because of the high sugar and fat content, it doesn't spoil quickly, but it can pick up "fridge smells" if you aren't careful. Always store it in an airtight container with parchment paper between the layers. It will stay fresh in the refrigerator for up to 2 weeks.
For long term storage, this fudge freezes beautifully. Wrap the individual squares in plastic wrap and then place them in a freezer bag. They will keep for up to 3 months. When you're ready to eat, just let a square sit on the counter for 10 minutes.
It actually tastes quite luxurious when it's slightly chilled!
Zero Waste Tip: If you find yourself with the "crumbs" or "shards" from the edges after slicing, don't toss them! Save those bits in a jar in the freezer. They make a world class topping for vanilla ice cream or can be folded into brownie batter for a surprise peanut butter swirl.
Elegant Serving Suggestions and Gourmet Gifting Tips
When it comes to serving, less is more. Because this fudge is so rich, a small 1 inch square is usually plenty for one person. If you’re hosting a party, try placing each square in a mini gold cupcake liner.
It makes the fudge look like it came from a high end chocolatier and keeps people's fingers from getting sticky.
For gifting, I love using small glass jars or kraft paper boxes. A little bit of twine and a sprig of fresh rosemary or a dried orange slice makes the whole thing feel artisanal. If you're feeling adventurous, you could even create a "Peanut Butter Lover's Basket" by including this fudge along with some Peanut Butter Cup Cookies recipe.
Chef's Tip: To get a truly professional look, sprinkle a tiny pinch of flaky sea salt (like Maldon) over the top of the fudge right after you press it into the pan. The crystals won't melt, and they provide a beautiful visual "shimmer" and a sharp pop of salt that balances the sweetness perfectly.
Right then, you’ve got the science, the steps, and the secrets. There's no reason to settle for mediocre fudge ever again. Go get your pan ready you’re about to make the best batch of your life! Let me know how it goes; I want to hear about that first velvety bite. Enjoy!

Recipe FAQs
What is the secret to making good, non-gritty peanut butter fudge?
Fully emulsifying the fats before adding dry ingredients. The secret is melting the butter and peanut butter until they are a glossy, uniform mixture, ensuring the sugar crystals are completely coated during mixing. This prevents the gritty texture common in poorly mixed batches.
What are the common mistakes when making fudge that cause oil separation?
Using heat that is too high is the primary mistake. If the peanut butter gets too hot, the oils break away from the solids, leading to a greasy layer on top as the fudge cools. Keep your heat at medium low to gently melt the fats together.
How long does it take for peanut butter fudge to set up completely?
Allow at least 1 hour in the refrigerator to set firm. After mixing the ingredients, press the fudge into the pan and let it rest on the counter for about 15 minutes before chilling. This initial rest prevents condensation when it hits the cold fridge.
Do you have to have vanilla extract for peanut butter fudge?
No, but it is highly recommended for flavor depth. Vanilla acts as an aromatic bridge that balances the heavy richness of the fat and the sweetness of the sugar. If you omit it, consider adding a pinch more salt or a drop of almond extract.
Can I use natural, stir style peanut butter in this recipe?
No, stick to commercial, stabilized peanut butter. Natural peanut butters separate too easily under heat and lack the stabilizers needed for this specific fudge structure. For a similar but different texture experience, explore our Cookie Butter Ice Cream Recipe: Creamy & Rich.
What is the best technique for slicing the fudge cleanly?
Use a long, sharp knife dipped in hot water. After chilling, lift the fudge out using the parchment paper sling. Wipe the knife clean and reheat it in hot water before each cut. This ensures a clean, non-stick pass through the dense candy base.
How can I enhance the flavor of peanut butter fudge without boiling?
Balance the sugar with high-quality salt and good vanilla. A small amount of flaky sea salt cuts through the sweetness and highlights the roasted nut flavor, much like the flavor balancing principles used in our Fudgy Brownie from recipe.
Peanut Butter Fudge In 10 Minutes

Ingredients:
Instructions:
Nutrition Facts:
| Calories | 195 kcal |
|---|---|
| Protein | 2.5 g |
| Fat | 12.3 g |
| Carbs | 20.5 g |
| Fiber | 0.5 g |
| Sugar | 18.6 g |
| Sodium | 88 mg |
