Crispy Japanese Chicken Katsu Don

- Prep10 Mins
- Cook20 Mins
- Servings1 bowl
- Time: 10 min active + 20 min cooking + 2 min resting
- Make it when: You need a cozy, filling dinner
- Pairs with: Miso soup or a pickled cucumber salad
Japan has a long history of "donburi" or rice bowls. These were originally designed as quick, hearty meals for people on the move, and they remain a staple of comfort in Japanese homes. It is the kind of food that feels like a hug in a bowl.
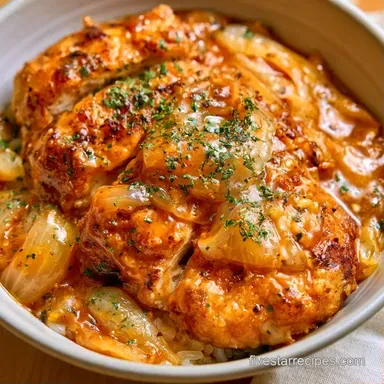
This version uses a breaded cutlet simmered in a sweet, savory sauce. The chicken katsu don balances the heavy fry with the lightness of a simmered egg.
You can expect a meal that looks gourmet but uses a single skillet for the final build. It is all about the contrast of textures and refined flavors.
Making the Perfect Chicken Katsu Don
- Even Thickness: Pounding the meat ensures the edges do not dry out before the center hits 165°F.
- The Panko Press: Pushing the crumbs into the meat creates a bond that keeps the coating from sliding off in the sauce.
- Residual Heat: Using a lid for the final egg pour allows the steam to set the proteins without overcooking the chicken.
Quick Facts
I like to use a wide skillet for this so the chicken and onions can lay flat. If your pan is too small, the egg will be too thick and won't cook evenly.
| Rice Choice | Texture | Best For |
|---|---|---|
| Short-grain | Sticky and plump | Traditional donburi |
| Jasmine | Fluffy and aromatic | A lighter, fragrant alternative |
| Brown Rice | Nutty and chewy | A heartier, fiber-rich option |
Using a wire rack for the fried chicken is non-negotiable. If you put it on a plate, the bottom steams and gets soggy in seconds.
Ingredients and Swaps
| Ingredient | Role | Best Swap |
|---|---|---|
| Panko | Creates a light, crisp texture | Breadcrumbs (results in a denser crust) |
| Dashi stock | Provides a savory umami foundation | Vegetable broth (lacks the same depth) |
| Honey | Offsets the saltiness of the soy | Maple syrup (slightly different sweetness) |
- 6 oz skinless, boneless chicken breast Why this? Lean and holds the breading well
- 1/2 cup all-purpose flour
- 1 large egg, beaten
- 1 cup panko breadcrumbs
- 1/4 tsp salt
- 1/4 tsp black pepper
- 1/2 cup neutral oil Why this? High smoke point for frying
- 3 tbsp reduced-sodium soy sauce
- 1 tbsp honey
- 1 tsp apple cider vinegar
- 1/2 cup dashi stock
- 3 oz yellow onion, thinly sliced
- 1 large egg, lightly beaten
- 1 cup short-grain white rice, cooked
- 1 green onion stalk, sliced
Gear for This Recipe
No professional setup is required, though certain equipment makes the job easier. A meat mallet is essential for creating a consistent thickness. I also suggest a digital thermometer to verify the chicken is safely cooked without drying it out.
Lastly, using a non-stick skillet simplifies sliding the mixture onto the rice.
From Prep to Plate
Stage 1: Flatten the chicken
Place the 6 oz chicken breast between two pieces of plastic wrap. Using a meat mallet, pound the thickest section until the whole breast is a uniform 1/2 inch (1.3cm) thick. Season both sides with 1/4 tsp salt and 1/4 tsp black pepper.
Stage 2: Bread the meat
Prepare a breading station using three separate bowls: 1/2 cup all-purpose flour, 1 beaten egg, and 1 cup panko breadcrumbs. Coat the chicken in flour, shake off any excess, dip it into the beaten egg, and press the panko firmly onto the meat until well-coated.

Stage 3: Fry until golden
Heat 1/2 cup neutral oil in a skillet to 350°F (180°C). Carefully add the chicken and fry for 3–4 minutes on each side until the crust is dark golden and it reaches an internal temperature of 165°F (74°C). Move the cutlet to a wire rack to rest for 2 minutes.
Stage 4: Simmer the sauce
Wipe the skillet clean of extra oil. Add 3 oz sliced yellow onion, 3 tbsp reduced-sodium soy sauce, 1 tbsp honey, 1 tsp apple cider vinegar, and 1/2 cup dashi stock. Sauté over medium heat until the onions are translucent and jammy.
Let the chicken katsu don sauce reduce slightly to ensure it coats the chicken.
Stage 5: Finish the egg
Cut the rested fried chicken into 1-inch (2.5cm) strips and place them on top of the simmering onions. Pour 1 lightly beaten egg over the chicken and onions. Cover the pan with a lid for 30–60 seconds until the egg is set but still slightly creamy.
Note: Use pasteurized eggs if you prefer a softer, less-cooked yolk.

Stage 6: Plating the bowl
Gently slide the combined chicken and egg over 1 cup of warm, cooked short-grain white rice. Garnish the dish with 1 sliced stalk of green onion.
Problems and Solutions
Breading slippage often results from a flour coat that's too heavy. For a proper bond, the egg must make direct contact with the meat. Additionally, a rubbery egg texture usually means the lid was kept on for too long.
Breading Is Falling Off
This occurs if the chicken is too damp or the panko wasn't pressed firmly. Be sure to shake off all extra flour before dipping in the egg.
Egg Is Too Runny
If the egg fails to set, your pan may not be hot enough. Using a lid traps steam to cook the top of the egg rapidly.
Chicken Is Dry
This is typically caused by overcooking. Always remove the meat once it hits 165°F.
| Problem | Root Cause | Solution |
|---|---|---|
| Breading slides off | Too much flour or insufficient pressure | Shake flour well and press panko firmly |
| Rubbery egg | Overcooked or no lid used | Cook for 60 seconds max with a lid |
| Soggier crust | Resting on a plate | Use a wire rack for 2 minutes |
| Bland sauce | Insufficient reduction | Simmer onions until the liquid thickens |
Inspect your chicken katsu don breading for any gaps prior to frying to stop the oil from soaking straight into the meat.
Visual Plating Tips

A refined dish relies on color balance. The base is the stark white of the rice, and the center is the deep brown of the chicken.
To make it look gourmet, I add three specific accents. First, the bright yellow of the silky egg provides a soft contrast. Second, the vibrant green of the sliced green onions is added at the very end to keep them crisp. Third, a sprinkle of toasted sesame seeds can add a tiny pop of tan and a nutty aroma.
Storage and Reheating
Keep leftovers in a sealed container and refrigerate for a maximum of 2 days.
Avoid microwaving the chicken, which can make the crust rubbery. Instead, heat the cutlet in your air fryer set to 350°F (175°C) for 3 minutes. Warm the sauce and rice independently on the stove. Ensure leftovers reach 165°F (74°C) according to USDA food safety guidelines.
This dish does not freeze well once assembled since the egg texture degrades. However, you can freeze the breaded cutlets before frying. Freeze them on a tray individually before transferring them to a bag.
Easy Variations
If you want to change things up, you can swap the protein. Tofu katsu works well if you use extra-firm tofu and press out the water first. It follows the same breading process but fries faster.
For a different flavor profile in this chicken katsu don bowl, try a spicy glaze. Mix a teaspoon of sriracha into the soy and honey mixture before adding the dashi. It adds a refined heat that cuts through the richness of the fried chicken.
Critical in Sodium
2100 mg of sodium per serving (91% of daily value)
American Heart Association recommendation: no more than 2,300 mg of sodium per day
Tips to Reduce Sodium
-
Swap the Soy Sauce
Replace the reduced-sodium soy sauce with coconut aminos, which offer a similar savory profile with much less sodium.
-
Choose Low-Sodium Dashi
Use a low-sodium dashi stock or prepare a homemade version using kombu and bonito flakes without adding extra salt.
-
Eliminate Added Salt
Omit the 1/4 tsp of salt from the chicken seasoning, as the sauce and stock already provide significant saltiness.
-
Enhance with Aromatics
Add freshly grated ginger or a squeeze of lemon juice to the sauce to increase flavor depth without relying on sodium.
-
Check Your Rice
Ensure the short-grain white rice is steamed without adding salt to the cooking water.
Questions Readers Ask
How many calories are in a chicken Katsudon?
One serving contains 1139 kcal.
Tip: using a smaller portion of rice can reduce the overall calorie count.
Is chicken katsu the same as katsudon?
Chicken katsu refers to the breaded cutlet alone, while katsudon is the complete dish served over rice with egg and onions.
Tip: serve the cutlet on its own with shredded cabbage for a lighter alternative.
Which rice works best for this dish?
Short-grain white rice is the best choice for its sticky consistency.
Tip: ensure the rice is warm when sliding the chicken and egg mixture on top.
Can I fry the cutlets ahead of time?
You can fry the chicken early and reheat it before assembling the bowl.
Tip: use an air fryer at 350°F (175°C) for 3 minutes to restore the crispiness.
Crispy Chicken Katsu Don
Ingredients:
Instructions:
Try These Next

Spring Roll Sauce
This Spring Roll Sauce is nutty and bright. Use this Vietnamese Spring Roll Sauce Recipe for a bold…

Easy Homemade Soft Naan Bread Skillet Recipe with Garlic Butter
Master our Easy Homemade Soft Naan Bread Skillet Recipe with Garlic Butter.

Oyako Donburi in 18 Minutes
Overcooked eggs often make rice bowls gummy. This Oyako Donburi uses residual heat to keep textures…
