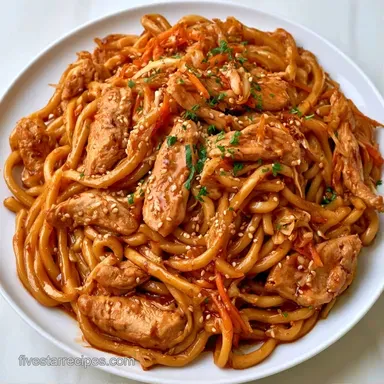
Quick and Healthy Yaki Udon

- Time: 5 min active + 10 min cooking
- Flavor & Texture: Savory, umami-rich, and chewy
- Perfect for: A quick weeknight dinner or a small dinner party
Ever wonder why some home stir-fries turn out soggy, while street-food versions have that intense, glossy finish? The secret usually lies in the heat and how the sauce is reduced. When preparing yaki udon, the goal is to sear ingredients rapidly so the vegetables stay crisp and the noodles maintain their structure.
This recipe focuses on a balanced sauce that coats the noodles perfectly without leaving a puddle on your plate. It is a fantastic choice for when you want a gourmet experience that doesn't take all day to prepare.
The soul of yaki udon is the bounce of the noodles combined with the depth of the soy and honey glaze. With a total time of 15 minutes, it's a dependable option for a fast, high-quality meal.
Why the Texture Works
- High Heat: Searing the chicken and vegetables quickly prevents them from steaming, which keeps the colors bright and the textures crisp.
- Honey Reduction: Simmering the honey and soy sauce creates a velvety glaze that sticks to the noodles without needing a cornstarch slurry.
Recipe Specs
Since the protein is the main variable here, you can swap the chicken based on what you have in the fridge.
| Protein | Timing | Texture | Impact |
|---|---|---|---|
| Chicken | 3 mins | Tender | Lean and mild |
| Beef | 2-4 mins | Hearty | Richer, deeper umami |
| Extra-Firm Tofu | 4-5 mins | Spongy | Lighter, absorbs more sauce |
The Essentials
- 2 tbsp low-sodium soy sauce
- 1 tbsp honey
- 1 tbsp water
- 1/2 tsp toasted sesame oil
- 1/4 tsp ground ginger
- 6 oz frozen or vacuum-packed udon noodles
- 4 oz chicken breast, thinly sliced
- 1/2 cup shredded carrots
- 1/2 cup sliced cabbage
- 1/4 cup sliced scallions
- 1 tbsp vegetable oil
- 1 tsp toasted sesame seeds
- 1 stalk chopped scallion greens
The sauce relies on the balance of salt and sweetness. Using low-sodium soy sauce allows you to control the seasoning without the dish becoming overly salty.
- Low-sodium soy sauce: 2 tbsp Why this? Provides the salty, savory base without overpowering other flavors.
- Honey: 1 tbsp Why this? Adds sweetness and helps the sauce thicken into a glaze.
- Water: 1 tbsp Why this? Thins the honey for easier whisking.
- Toasted sesame oil: 1/2 tsp Why this? Adds a nutty, aromatic finish.
- Ground ginger: 1/4 tsp Why this? Adds a subtle, warm zing.
- Udon noodles (frozen or vacuum-packed): 6 oz Why this? The thickness provides the signature chewy bite.
- Chicken breast, thinly sliced: 4 oz Why this? Lean protein that cooks rapidly at high heat.
- Shredded carrots: 1/2 cup Why this? Adds color and a mild sweetness.
- Sliced cabbage: 1/2 cup Why this? Provides a crisp-tender contrast to the soft noodles.
- Sliced scallions: 1/4 cup Why this? Fresh, oniony bite.
- Vegetable oil: 1 tbsp Why this? High smoke point for searing.
- Toasted sesame seeds: 1 tsp Why this? Adds a slight crunch and visual polish.
- Chopped scallion greens: 1 stalk Why this? Bright, fresh garnish.
Must-Have Tools
A large non-stick skillet or a wok is best. You need a pan with high sides so you can toss the noodles and vegetables without them flying over the edge. A whisk is helpful for the sauce, but a fork works fine.
The Cooking Process
Phase 1: The Quick Prep
- In a small bowl, whisk together 2 tbsp low-sodium soy sauce, 1 tbsp honey, 1 tbsp water, 1/2 tsp toasted sesame oil, and 1/4 tsp ground ginger. Stir until the honey is completely dissolved.

- Place 6 oz udon noodles in a colander. Rinse under hot tap water for 30 seconds until the strands separate easily, then drain thoroughly.
Phase 2: The High-Heat Sear
- Heat 1 tbsp vegetable oil in a large non-stick skillet or wok over medium-high heat until the oil begins to shimmer.
- Arrange 4 oz sliced chicken breast in a single layer. Sear without stirring for 2 minutes until golden brown, then flip and cook for 1 more minute. Confirm the chicken hits an internal temperature of 165°F (74°C).

- Stir in 1/2 cup shredded carrots and 1/2 cup sliced cabbage. Stir-fry for 2 minutes until the cabbage is just wilted but still retains its crunch.
Phase 3: The Final Glaze
- Add the loosened udon noodles and 1/4 cup sliced scallions. Toss them with the chicken and vegetables for 1 to 2 minutes.
- Pour the prepared sauce over the mixture. Toss continuously over high heat for 60 seconds until the sauce thickens into a deep amber glaze that clings to the noodles.

- Remove from the heat immediately. Garnish with 1 tsp toasted sesame seeds and 1 stalk of chopped scallion greens.
Chef: For a bolder taste, I like mixing in some red pepper flakes for a touch of heat.
Common Problems and Fixes
Clumping Noodles
If the udon sticks together in a ball, avoid forcing them apart with a spoon, as this can break the noodles. Use tongs to gently lift and rotate them. If they are still stubborn, add a tablespoon of water to the pan to create a burst of steam.
Watery Sauce
A watery sauce usually happens if the heat is too low or the noodles were too wet when added. Crank the heat to high and toss constantly. The honey needs to reach a specific temperature to thicken and glaze.
Overcooked Vegetables
Vegetables that turn mushy are usually a result of overcrowding the pan. Cook the chicken first and ensure the pan is hot before adding the carrots and cabbage.
| Problem | Fix |
|---|---|
| Clumping Noodles | Use tongs or add 1 tbsp water |
| Watery Sauce | Increase heat and toss continuously |
| Mushy Vegetables | Avoid overcrowding the pan |
Serving Suggestions

This dish is hearty on its own, but I like serving it with a side of steamed edamame or a crisp cucumber salad. Since this is often used for a special dinner, plating it in a wide, shallow bowl makes the glossy amber glaze look more professional.
Storage and Reheating
Store any remaining portions in an airtight container in the refrigerator for a maximum of 3 days.
Steer clear of the microwave, which tends to leave the noodles rubbery. Instead, warm them in a skillet over medium heat until steaming hot throughout and the chicken reaches 165°F (74°C) in the thickest piece. Stir in a bit of water or low-sodium broth to loosen the udon and restore its glossy appearance.
Freezing is not advised. The moisture from the cabbage combined with the udon's starch often results in a mushy, unappealing texture once thawed.
Easy Yaki Udon Swaps
Yaki Udon with Beef
Substitute the chicken with 4 oz of thinly sliced ribeye or flank steak. Beef cooks more quickly than chicken, so sear it for about 1 to 2 minutes per side until it hits 145°F (63°C) and let it rest for 3 minutes.
Tofu and Mushroom Power-Bowl
For a plant-based alternative, use 4 oz of pressed extra-firm tofu and 1/2 cup of sliced shiitake mushrooms. Brown the mushrooms first, then add the tofu. Season the tofu directly with a splash of soy sauce during the searing process.
For a Spicy Kick
Mix in 1 tsp of chili garlic paste or sriracha to the sauce. This provides a tangy, acidic brightness that balances the rich sesame oil.
Critical Sodium Level
1300 mg of sodium per serving (57% of daily value)
According to the American Heart Association, keeping daily sodium below 2,300mg is better for overall heart health.
Tips to Reduce Sodium
-
Try Coconut Aminos
Substitute low-sodium soy sauce with coconut aminos for a similar savory taste with much less salt.
-
Pick Better Noodles
Select fresh, preservative-free udon or brown rice noodles instead of vacuum-packed varieties, which often use salt as a preservative.
-
Incorporate Bright Acid
Mix in fresh lime juice or rice vinegar to sharpen the flavor, allowing you to use less salt while keeping the taste bold.
-
Increase Fresh Aromatics
Add extra freshly grated ginger or more minced garlic to give the sauce more punch and complexity.
-
Use Sodium-Free Spices
Stir in red pepper flakes or extra toasted sesame seeds for a flavor boost and crunch without any added sodium.
Common Questions
Do you need to boil udon before frying?
No, this is a common misconception. You only need to run hot tap water over frozen or vacuum-packed noodles for 30 seconds to separate them.
How to store leftover yaki udon?
Place the leftovers in a sealed tub. Store them in the refrigerator for a maximum of three days.
What is the difference between yaki udon and soba?
Yaki udon uses thick wheat noodles that are stir-fried, while soba consists of thinner buckwheat noodles. This dish emphasizes the chewy texture of the fried wheat noodle.
Can I use frozen vegetables for the stir-fry?
Yes, you can use frozen carrots and cabbage. They may release more moisture, so stir-fry them slightly longer to prevent the dish from becoming soggy.
How do I reheat the noodles without making them rubbery?
Heat them in a skillet over medium heat. Add a splash of water to loosen the noodles and restore the glossy finish.
Why does yaki udon differ from standard udon?
Yaki udon is stir-fried in a pan with a sauce, whereas standard udon is typically served in a broth. This creates a concentrated glaze instead of a soup.
Which steps prepare the sauce?
Whisk together soy sauce, honey, water, toasted sesame oil, and ground ginger in a small bowl. Mix until the honey is fully dissolved.
Why is my sauce not glazing the noodles?
Ensure you use high heat during the final 60 seconds of cooking. This allows the sauce to reduce quickly into an amber glaze.
Yaki Udon in 15 Minutes