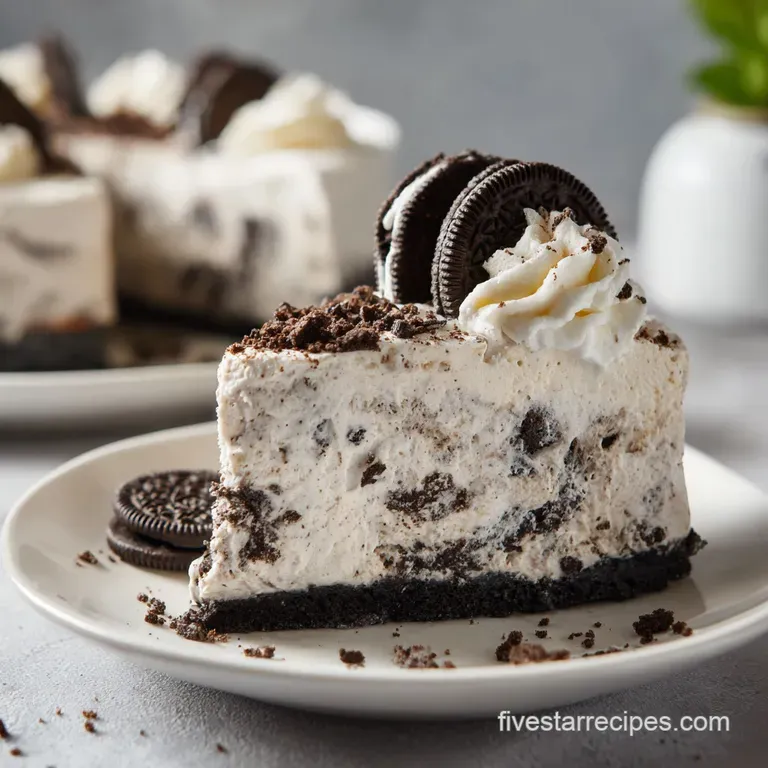
Oreo Ice Cream Cake: Velvety and Stabilized
- Time: Active 45 minutes, Passive 8 hours, Total 8 hours 45 minutes
- Flavor/Texture Hook: Shatter crisp chocolate crust with velvety fudge and stabilized cream
- Perfect for: High stakes birthdays, gourmet summer parties, and advanced meal prep desserts
Mastering the Ultimate Ice Cream Cake
We’ve all been there: you pull a homemade treat out of the freezer, and instead of a pristine, layered masterpiece, you’re met with a puddle of grayish slush or a crust so soggy it has the texture of wet cardboard.
It’s frustrating because the ingredients aren't cheap, and the expectation for a celebration is high. I remember making a cake for a friend’s graduation where the fudge layer just tunneled into the vanilla ice cream, creating a marbled mess that looked more like an accident than a dessert.
That was the day I realized that making a five star Ice Cream Cake isn't just about freezing things; it’s about managing moisture and fat.
The real secret to a professional grade Ice Cream Cake lies in the barrier between the wet and dry components. If your cookie crumbs absorb the melting ice cream before they fully freeze, the "crunch" is gone forever.
By using melted unsalted butter and a touch of sea salt, we create a fat jacket around every single crumb. This makes the base hydrophobic, meaning it literally repels the moisture from the softening ice cream above it.
It’s the difference between a crust that shatters satisfyingly and one that bends sadly under your fork.
In this guide, we are focusing on precision. We aren't just slapping things together; we are building a structural dessert. From the specific Dutch process cocoa used in our "soft pour" fudge to the Greek yogurt that keeps our whipped cream from weeping, every step is designed to prevent the typical failures of home freezing.
You’ll get distinct lines, a rich mouthfeel, and a cake that stays stable long enough for you to actually sing "Happy Birthday" without it collapsing into a heap.
Why the Layers Stay Separate
- Hydrophobic Fat Barrier: The melted butter coats the cookie crumbs, creating a waterproof seal that prevents the ice cream from soaking into the crust and turning it soggy.
- Protein Stabilization: Adding Greek yogurt to the heavy cream provides extra structure through milk proteins, ensuring the frosting doesn't deflate or weep during the final freeze.
- Inverted Sugar Mechanics: The maple syrup in the fudge acts as an interfering agent, keeping the chocolate layer soft and scoopable even at sub zero temperatures.
- Controlled Crystallization: Freezing in stages allows each layer to set firmly enough to support the weight of the next without mixing or "bleeding" at the contact points.
| Fresh Approach | Shortcut Method | Texture Impact | Time Investment |
|---|---|---|---|
| Homemade Stabilized Frosting | Canned Whipped Topping | Velvety and thick vs. Airy and oily | +10 minutes |
| Maple Cocoa "Soft Pour" Fudge | store-bought Jarred Fudge | Pours easily and stays soft vs. Becomes rock hard | +5 minutes |
| Butter Bound Cookie Base | Plain Crushed Cookies | Shatter crisp snap vs. Grainy and damp | +5 minutes |
The difference between a gourmet result and a basic one often comes down to these small, deliberate choices. While the shortcut method might save you fifteen minutes total, the sensory experience of a fresh, butter bound crust and real whipped cream is what makes people ask for the recipe.
Crucial Recipe Specifications
When you are working with frozen tiers, the internal temperature of your freezer and the thickness of your layers determine the success of the slice. If your freezer is set to a standard 0°F (-18°C), you need to be mindful of how long the cake sits at room temperature during assembly.
This recipe is built for a 9 inch springform pan, which provides the necessary depth for the classic four layer profile.
If you like the idea of layered frozen treats but want something with a baked element, my Cheesecake Brownie Cake recipe uses similar temperature control techniques to keep the layers distinct. Precision here isn't just a suggestion; it's the only way to avoid a structural collapse when the ring of the springform pan is finally released.
| Ingredient | Science Role | Pro Secret |
|---|---|---|
| Unsalted Butter | Moisture Barrier | Use melted butter to coat every crumb for a waterproof base. |
| Dutch Process Cocoa | Flavor Neutralization | This cocoa has lower acidity, providing a darker color and smoother chocolate notes. |
| 5% Fat Greek Yogurt | Structural Support | The high protein and fat content prevent the whipped cream from losing air. |
| Sea Salt | Flavor Contrast | A small amount of salt suppresses bitterness and enhances the perception of sweetness. |
Choosing the right components ensures that the Ice Cream Cake behaves predictably. For instance, using 5% fat yogurt is vital; non fat versions contain too much water, which will turn into ice crystals in your frosting, ruining that velvety finish we are after.
Selecting the Right Components
- Dark chocolate sandwich cookies (2 cups): Use the full cookie, including the cream filling, as the cream helps bind the crust together along with the butter.
- Unsalted butter (4 tbsp): Avoid salted butter here; we want to control the sodium levels ourselves with the sea salt. Why this? Provides the fat needed to waterproof the cookie crust.
| Substitute: Coconut Oil | Same fat to liquid ratio, adds a subtle tropical note. |
- Vanilla bean ice cream (1.5 quarts): high-quality vanilla bean offers those beautiful black flecks and a more "gourmet" look.
| Substitute: Custard Ice Cream | Richer yolk based base for a denser, creamier texture. |
- Chocolate ice cream (1.5 quarts): Select a dark or Dutch process chocolate version if possible to match the fudge.
| Substitute: Coffee Ice Cream | Pairs brilliantly with the chocolate fudge for a mocha twist. |
- Dutch process cocoa powder (0.5 cup): Crucial for that deep, professional chocolate flavor without the graininess. Why this? Dissolves better into the syrup for a smooth "soft pour" texture.
| Substitute: Natural Cocoa | Will be lighter in color and slightly more acidic. |
- Pure maple syrup (0.33 cup): This acts as our liquid sweetener that won't freeze solid.
| Substitute: Light Corn Syrup | Provides the same anti crystallization benefits with a neutral flavor. |
- Heavy cream (1.75 cups total): Divided into 0.25 cup for the fudge and 1.5 cups for the frosting. Why this? High fat content is necessary for aeration and mouthfeel.
| Substitute: Coconut Cream | Use the thick part of the can for a dairy-free frosting alternative. |
- Greek yogurt, 5% fat (0.5 cup): The "secret" stabilizer for the frosting.
| Substitute: Mascarpone | Adds a rich, buttery thickness but with less tang than yogurt. |
- Powdered monk fruit (3 tbsp): Keeps the frosting light without adding the grittiness of granulated sugar.
| Substitute: Powdered Sugar | Use at a 1:1 ratio for a traditional sweetness profile. |
For those who crave that classic snack cake nostalgia, you might also enjoy making a Gourmet Ho Ho Cake which shares that iconic cream and chocolate profile while being entirely shelf stable at room temperature.
Essential Kitchen Tools
To achieve the sharp edges and even layers of a professional Ice Cream Cake, you need a few specific items. A 9 inch springform pan is non negotiable; you cannot easily lift a frozen cake out of a standard cake tin without destroying the sides.
I also highly recommend using parchment paper to line both the bottom and the sides of the pan. This prevents the ice cream from sticking to the metal, ensuring a clean release.
An offset spatula is your best friend during assembly. It allows you to smooth the ice cream into the corners of the pan without your knuckles dipping into the cream. Finally, a high-quality stand mixer or electric hand mixer is essential for the stabilized frosting.
You need consistent aeration to incorporate the Greek yogurt without deflating the heavy cream, which is much harder to achieve by hand.
Precise Assembly Steps
- Line a 9 inch springform pan with parchment paper. Combine crushed cookies, melted butter, and sea salt. Press firmly into the bottom of the pan to create a hydrophobic fat barrier crust. Freeze for 15 minutes. Note: Firm pressing ensures the crust doesn't crumble when sliced.
- Slightly soften the vanilla bean ice cream and spread it in an even layer over the crust using an offset spatula. Freeze for 30 minutes until the surface is firm to the touch.
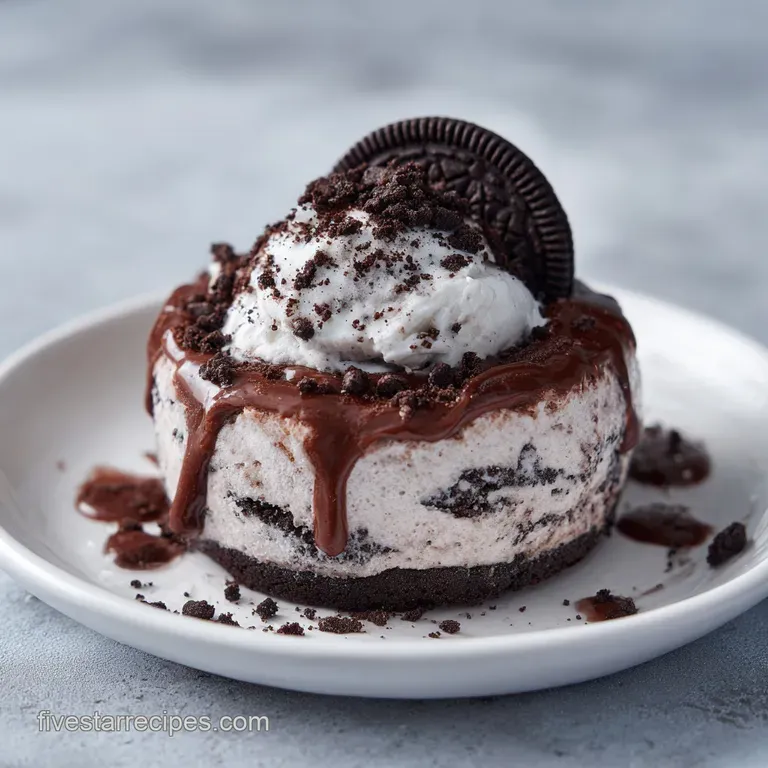
- Whisk together cocoa powder, maple syrup, 1/4 cup heavy cream, and vanilla extract to create the 'soft pour' fudge. Pour over the vanilla layer and freeze for 1 hour until the fudge is tacky but not runny.
- Soften the chocolate ice cream and spread it over the fudge layer. Return to the freezer for at least 4 hours until the entire core is solid.
- In a chilled bowl, whip 1.5 cups heavy cream with powdered monk fruit until soft peaks form. Gently fold in the cold Greek yogurt and whip until stiff peaks form. Note: The yogurt proteins will stabilize the frosting for a five star finish.
- Remove the cake from the springform pan. Frost the top and sides with the stabilized cream. Freeze for a final 2 hours or until ready to serve until the frosting is matte and set.
Chef's Tip: Before slicing, dip a long, thin knife into a tall glass of very hot water, then wipe it dry. The heat will melt through the frozen layers like butter, giving you those clean, Instagram ready edges.
Fixing Assembly Errors
Why the Layers Mixed Together
If you find that your vanilla and chocolate layers have merged into a swirling mess, the root cause is almost always impatience. If the first layer isn't frozen "hard" enough, the weight and warmth of the second layer will cause it to sink. This is especially true when adding the fudge.
If the vanilla isn't solid, the fudge will tunnel right to the bottom.
Why the Cake is Hard to Cut
A rock hard cake usually means it has been in a deep freeze for too long without any "tempering" time. While we want it frozen for structure, a cake straight from a 0°F freezer is a brick.
If your "soft pour" fudge turned into a glacier, you likely didn't use enough maple syrup or corn syrup, which are necessary to lower the freezing point of that specific layer.
| Problem | Root Cause | Solution |
|---|---|---|
| Crumbly Crust | Not enough butter or pressure | Use the bottom of a flat glass to press crumbs firmly. |
| Weeping Frosting | low-fat yogurt or over whipping | Always use 5% fat yogurt and stop at stiff peaks. |
| Ice Crystals | Ice cream melted too much during prep | Soften ice cream in the fridge, not on the counter. |
Common Mistakes Checklist
- ✓ Never skip lining the pan with parchment; metal to ice cream contact causes sticking.
- ✓ Ensure the Greek yogurt is cold from the fridge before folding it into the cream.
- ✓ Avoid over softening the ice cream; it should be the texture of soft serve, not soup.
- ✓ Use Dutch process cocoa specifically to avoid a grainy mouthfeel in the fudge layer.
- ✓ Clean your knife between every single cut for the most professional presentation.
Creative Flavor Twists
If you want to turn this into a Peanut Butter Powerhouse, simply swap the vanilla ice cream for peanut butter swirl and add 1/4 cup of smooth peanut butter to the fudge mixture. The fat in the peanut butter actually helps the fudge stay even softer when frozen.
You can also replace the cookie crust with crushed pretzels for a salty sweet contrast that is absolutely addictive.
To make this dairy-free, use a high fat coconut based ice cream for both layers. For the frosting, use the chilled fat from two cans of full fat coconut milk whipped with the powdered monk fruit. Skip the yogurt and use a teaspoon of cream of tartar to help stabilize the coconut peaks.
The result is just as decadent but completely plant based.
Proper Storage Methods
- Fridge: Do not store this in the fridge. It is an Ice Cream Cake; it will be soup in 20 minutes.
- Freezer: Store in an airtight container or tightly wrapped in plastic wrap for up to 2 weeks. After 14 days, the whipped cream may begin to absorb "freezer smells."
- Zero Waste: If you have leftover slices that are starting to look a bit messy, throw them into a blender with a splash of milk for the most incredible, high end milkshake you’ve ever had. You can also crumble leftover crust and frosting into a container to use as a "sundae mix" for later.
Serving Suggestions
One of the biggest myths in the kitchen is that you should let an Ice Cream Cake sit on the counter for 30 minutes to "soften up." This actually ruins the texture. The outside will melt into a puddle while the center remains a block of ice.
Instead, let the cake sit in the refrigerator for 15 to 20 minutes before serving. This allows the temperature to rise evenly throughout the cake, making it easy to slice without destroying the structural integrity.
Another myth is that you can't make this ahead of time. You absolutely can! In fact, the flavors meld better if it sits in the freezer for a full 24 hours. The cookie crust softens just slightly against the butter, and the fudge sets into a perfect, fudgy ribbon.
Just make sure it is tightly covered to prevent any ice crystals from forming on the beautiful white frosting. Serve it on a chilled platter to give your guests those extra few minutes to admire your handiwork before it’s time to eat.

Recipe FAQs
Does any specific country hold the title for eating the most ice cream?
Yes, New Zealand consistently leads the world in per capita consumption. Their high demand for premium ice cream has influenced how many cultures approach frozen dessert layering techniques.
What is the 1234 rule for cake?
This refers to a classic pound cake ratio of 1 cup butter, 2 cups sugar, 3 cups flour, and 4 eggs. While useful for baking sponges, ice cream cakes rely on distinct fat-to-protein ratios rather than traditional baking flour measurements to maintain structural integrity.
What kind of cake is used for an ice cream cake base?
A crushed cookie and butter crust is standard. By mixing crushed cookies with melted butter and sea salt, you create a hydrophobic barrier that prevents the base from absorbing moisture. If you enjoy achieving this perfect textural crust balance, you can apply similar logic to no-bake pie crusts.
Does Aldi have an ice cream cake available?
Yes, they occasionally carry seasonal ice cream cake options in their freezer section. Homemade versions, however, allow you to control the quality of the fudge and the stability of the whipped cream frosting.
How to prevent the ice cream layers from sliding apart?
Freeze each layer individually for the specified duration before adding the next. Ensure your fudge layer is fully chilled and use an offset spatula to spread the ice cream evenly, which creates a more uniform surface for the subsequent layer to grip.
How to achieve the perfect stabilized whipped cream topping?
Whip the cold heavy cream and monk fruit until soft peaks form, then fold in cold Greek yogurt. The proteins within the yogurt act as a stabilizer, allowing the frosting to hold its shape perfectly even after being removed from the freezer for service.
How to ensure the crust remains crunchy?
Press the cookie and butter mixture firmly into the pan to create a dense, protective fat barrier. Freezing this crust for 15 minutes before adding any ice cream is essential to lock the fats in place and keep the base shatter crisp.
Homemade Oreo Ice Cream Cake
Ingredients:
Instructions:
Nutrition Facts:
| Calories | 542 kcal |
|---|---|
| Protein | 7g |
| Fat | 37g |
| Carbs | 48g |
| Fiber | 3g |
| Sugar | 32g |
| Sodium | 195mg |
