Amish Friendship Bread Starter and Recipe
- Time: Active 15 minutes, Passive 10 days, Total 10 days 1 hours 15 mins
- Flavor/Texture Hook: Tangy sweet interior with a crunchy cinnamon shatter crust
- Perfect for: Community sharing, holiday gifting, and patient home bakers
- Mastering the Amish Friendship Bread Starter and Recipe
- The Microbiology Governing Fermentation and Texture
- Strategic Component Analysis and Precision
- Sourcing Your Gourmet Bread Elements
- Tools Required for Professional Results
- The Ten Day Precision Baking Process
- Overcoming Common Starter and Baking Hurdles
- Scaling the Amish Friendship Bread Recipe
- Debunking Common Fermentation Myths
- Maximizing Freshness and Longevity
- Aesthetics for Gourmet Presentation
- Amish Friendship Bread Starter FAQ
- 📝 Recipe Card
Mastering the Amish Friendship Bread Starter and Recipe
The air in my kitchen currently smells like a warm, sugary hug, and it is all because of that bubbling bag sitting on my counter. If you have ever had a friend drop off a mysterious bag of beige goo with a set of instructions, you know the drill.
It’s the sourdough of the suburban world, but much more forgiving and arguably more nostalgic. I remember my first time, I was so worried about "killing" the starter that I practically treated it like a newborn.
I’ve since learned that this culture is incredibly resilient, and the resulting loaf is something truly special.
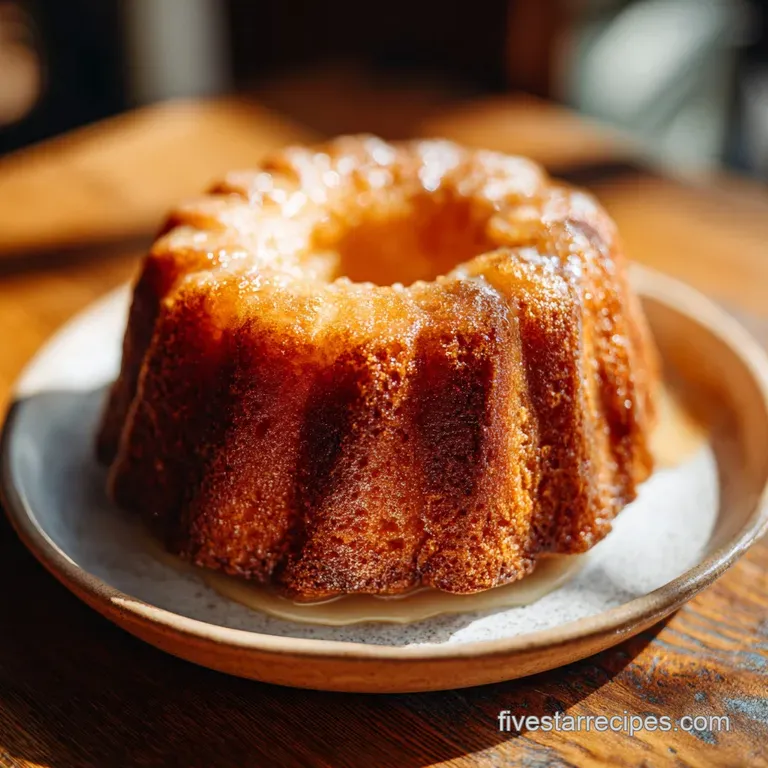
We are aiming for a specific texture here: a dense, velvety crumb that feels substantial but not heavy, topped with a cinnamon sugar layer that provides a satisfying shatter when you bite into it. This is not just another muffin style bread.
The 10 day fermentation period develops a slight tang that cuts through the sweetness, making it addictive. We will go through the precision needed to keep your starter healthy and how to bake a five star loaf every single time.
This guide focuses on the technical side of the amish friendship bread starter and recipe so you can stop guessing if your bag is "active" enough. We will skip the fluff and get into the science of why we mush that bag every day and how the chemistry of applesauce and oil creates the ultimate mouthfeel.
Whether you are starting from scratch or have been gifted a bag, we are going to make sure your results are foolproof.
The Microbiology Governing Fermentation and Texture
- Yeast Proliferation: The initial activation in warm water (110°F/43°C) ensures the active dry yeast begins metabolizing sugars immediately to establish a dominant colony.
- Lactic Acid Development: Over the 10 day cycle, wild bacteria and yeast from the flour and air create organic acids that tenderize gluten and deepen the flavor.
- Sugar Saturation: Adding sugar at specific intervals provides the necessary fuel for the starter while preventing the culture from becoming overly acidic or dormant.
- Enzymatic Breakdown: The resting periods allow enzymes in the flour to break down complex starches into simple sugars, contributing to the mahogany crust color during baking.
Decision Path for Starter Methods
| Method | Total Time | Flavor Depth | Effort Level |
|---|---|---|---|
| Traditional Starter | 10 days | Complex, tangy | Low (daily mushing) |
| Yeast Shortcut | 1 hour | Sweet, simple | Minimal |
| Sourdough Hybrid | 5 days | Very tangy | Moderate |
Choosing the traditional 10 day amish friendship bread starter and recipe method allows the flavors to mature in a way that the 1 hour shortcut simply can't replicate. The slow fermentation creates a more stable crumb structure. If you find yourself enjoying the process of slow fermented foods, you might also find the earthy complexity of a Musur Daler Recipe quite satisfying for a weeknight meal.
Strategic Component Analysis and Precision
| Component | Science Role | Pro Secret |
|---|---|---|
| Whole Milk | Provides lactose and fats | Use room temperature milk to avoid shocking the yeast during the feed cycle. |
| Unsweetened Applesauce | Humectant and acidity | The malic acid in applesauce helps activate the baking soda for a better vertical rise. |
| All purpose Flour | Gluten framework | Sift the flour before measuring to ensure a light, velvety texture rather than a dense brick. |
| Active Dry Yeast | Primary leavening | Ensure the water is exactly 110°F (43°C); too hot will kill the culture instantly. |
Sourcing Your Gourmet Bread Elements
To achieve a five star result, your ingredients must be fresh. This recipe relies on the synergy between the starter and the chemical leaveners added on baking day.
- 2.25 tsp Active Dry Yeast: Why this? Essential for the initial fermentation kick start. (Substitute: 2.25 tsp Instant Yeast, but skip the water proofing).
- 0.25 cup Warm water (110°F/43°C): Why this? The precise temperature for yeast activation. (Substitute: Warm milk for a richer start).
- 1.5 cups All purpose flour (divided): Why this? Provides the starch for the yeast to consume. (Substitute: White whole wheat for a nuttier profile).
- 1.5 cups Granulated sugar (divided): Why this? Fuels the starter and provides sweetness. (Substitute: Raw cane sugar for deeper molasses notes).
- 1.5 cups Whole milk (divided): Why this? Adds fat and protein for crumb structure. (Substitute: Full fat oat milk for a dairy-free version).
- 3 Large eggs: Why this? Provides structure and emulsification. (Substitute: 0.75 cup liquid aquafaba).
- 0.5 cup Avocado oil: Why this? Neutral oil keeps the bread moist longer than butter. (Substitute: Melted coconut oil for a tropical hint).
- 0.5 cup Unsweetened applesauce: Why this? Replaces some fat while adding moisture. (Substitute: Mashed banana for a flavor twist).
- 2 tsp Ground cinnamon: Why this? The primary aromatic profile of the bread. (Substitute: Pumpkin pie spice for seasonal variety).
Tools Required for Professional Results
You don't need fancy equipment, but precision is key. A high-quality digital thermometer is non negotiable for checking the water temperature and the internal doneness of the loaf. Use a non reactive bowl (glass or ceramic) for the starter, as metal can sometimes interfere with the long term fermentation.
For the baking phase, two 9x5 inch loaf pans are standard. I prefer heavy duty aluminum pans because they conduct heat evenly, ensuring the edges don't burn before the center is set. A silicone spatula is also helpful for making sure every bit of the velvety batter gets into the pans.
The Ten Day Precision Baking Process

Phase 1: Creating the Starter
- Activate the yeast. Dissolve 2.25 tsp active dry yeast in 0.25 cup warm water (110°F/43°C) and let it stand for 10 minutes until foamy and fragrant.
- Combine the base. In a gallon sized Ziploc bag or glass bowl, mix 0.5 cup flour, 0.5 cup sugar, and 0.5 cup milk with the yeast mixture. Note: This is Day 1.
- Perform daily maintenance. For Days 2 through 4, "mush" the bag or stir the bowl once daily to redistribute the yeast and gases.
- Execute the Day 5 feed. Add 0.5 cup flour, 0.5 cup sugar, and 0.5 cup milk to the bag; mush thoroughly to incorporate.
- Continue the rest. For Days 6 through 9, continue the daily mushing ritual until the mixture looks bubbly and active.
Phase 2: The Baking Ritual (Day 10)
- Finalize the starter. Add the remaining 0.5 cup flour, 0.5 cup sugar, and 0.5 cup milk. Portion out 1 cup of starter for your current recipe. Note: Give remaining portions to friends or start a new cycle.
- Emulsify the wet ingredients. Beat 3 large eggs with 0.5 cup avocado oil, 0.5 cup applesauce, and 1 tsp vanilla extract in a large bowl.
- Integrate dry components. Whisk together 2 cups flour, 0.75 cup sugar, 1.5 tsp baking powder, 0.5 tsp baking soda, 0.5 tsp sea salt, and 2 tsp cinnamon; fold into the wet mixture until just combined and no dry streaks remain.
- Prepare the pans. Coat two 9x5 pans with oil and dust with a mixture of 0.25 cup sugar and 1 tsp cinnamon until the interior is fully shielded.
- Bake to precision. Pour batter into pans and bake at 325°F (165°C) for 1 hour until a toothpick comes out clean and the top feels firm.
Overcoming Common Starter and Baking Hurdles
The most common issue I see with the amish friendship bread starter and recipe is a starter that stops bubbling. This usually happens if the environment is too cold. Yeast is a living organism; it likes a cozy room temperature.
If your kitchen is drafty, move the bag to the top of the refrigerator where it stays slightly warmer.
Troubleshooting the Fermentation and Bake
| Problem | Root Cause | Solution |
|---|---|---|
| Starter smells like vinegar | Over fermentation or heat | Move to a cooler spot and feed it immediately to balance the pH. |
| Bread has a sunken middle | Underbaked or too much mushing | Ensure the internal temperature reaches 190°F (88°C) before removing. |
| Crust is too hard/burnt | Excess sugar in the dust | Tent with foil at the 40 minute mark to protect the surface. |
Critical Success Checklist
- ✓ Calibrate your oven with an external thermometer to ensure a true 325°F (165°C).
- ✓ Never use metal spoons or bowls for the long term starter maintenance.
- ✓ Squeeze all excess air out of the Ziploc bag after each daily mushing.
- ✓ Use fresh baking soda and powder; the starter's acidity needs active leaveners to lift.
- ✓ Allow the bread to cool in the pan for exactly 10 minutes before turning it out.
Scaling the Amish Friendship Bread Recipe
Adjusting the Yield
When scaling down, you can halve the baking ingredients, but you should still use 1 full cup of starter. This will result in a slightly more tangy loaf. For scaling up (making 4 loaves), do not quadruple the salt or cinnamon immediately. Use 1.5x the spices first and taste the batter.
Baking four loaves at once often requires increasing the bake time by about 10-15 minutes because of the moisture load in the oven.
Serving Size and Prep Guide
| Servings | Starter Amount | Pan Size | Total Bake Time |
|---|---|---|---|
| 12 (1 loaf) | 0.5 cup | 9x5 inch | 55-60 mins |
| 24 (2 loaves) | 1 cup | Two 9x5 inch | 60 mins |
| 48 (4 loaves) | 2 cups | Four 9x5 inch | 75 mins |
If you are making a large batch for a bake sale, the organization is similar to prepping a Quaker Oats Meatloaf recipe for a large family gathering. Consistency in your measurements is what separates a hobbyist from a pro.
Debunking Common Fermentation Myths
A common misconception is that the starter will "spoil" if left out. Because of the high sugar and milk content, the fermentation creates an acidic environment that is quite hostile to bad bacteria, provided you follow the feeding schedule. Another myth is that you MUST use a Ziploc bag.
A glass jar with a loose lid works perfectly fine and is better for the environment.
Maximizing Freshness and Longevity
Storage Guidelines: This bread keeps beautifully at room temperature for up to 4 days if wrapped tightly in plastic wrap. The sugar crust acts as a partial sealant. For longer storage, refrigerate for up to a week, though this may firm up the avocado oil and change the texture slightly.
Freezing Instructions: To freeze, wrap the fully cooled loaf in parchment paper, then a double layer of aluminum foil. It stays five star quality for up to 3 months. Thaw overnight at room temperature. To regain that "shatter" in the crust, pop a slice in a toaster oven for 2 minutes.
Zero Waste Tip: If you have too much starter and no friends left to give it to, don't throw it away. You can use the "discard" to make incredible pancakes or waffles. Simply swap out some of the liquid and flour in your favorite batter for the starter.
It provides a gourmet tang that rivals the best brunch spots.
Aesthetics for Gourmet Presentation
To elevate the look of your amish friendship bread starter and recipe, don't just dump the batter in. Sprinkle half the cinnamon sugar at the bottom, pour half the batter, sprinkle more sugar, then add the rest of the batter. Use a knife to swirl it gently. This creates a beautiful marbled effect inside.
For a true "five star" presentation, serve a thick slice slightly warm with a dollop of salted honey butter. The contrast between the salty butter and the sweet, velvety crumb is spectacular. If you are serving this as a dessert, it pairs wonderfully with the flavors found in a Warm Homemade Apple recipe, perhaps even served alongside a scoop of vanilla bean ice cream. The visual of the dark mahogany crust against a bright white plate is always a crowd pleaser.

Amish Friendship Bread Starter FAQ
What is the starter for Amish Friendship Bread?
It is a yeasted, fermented batter made from flour, sugar, milk, and water. This "mother culture" is fed daily for 10 days, which develops the characteristic mild tang and incredible moistness in the final loaf.
What's the difference between Amish Friendship Bread starter and sourdough starter?
The main difference is the leavening agent and required maintenance. Amish starter relies primarily on commercial active dry yeast and requires daily additions of flour, sugar, and milk; sourdough relies on wild yeast and bacteria colonies established from the environment.
How to keep Amish Friendship Bread starter?
Maintain it by "mushing" or stirring daily and feeding it on Day 5 and Day 10 of the cycle. Keep the container at a consistent room temperature, ideally between 68°F and 75°F, for optimal activity.
How to use frozen Amish Friendship Bread starter?
Thaw the starter completely in the refrigerator overnight, then let it sit at room temperature for several hours. Once thawed, treat it as a regular, unfed starter and resume the daily mushing schedule until it shows vigorous bubbling.
Can I skip the 10-day process and use instant yeast instead?
Yes, you can use a quick yeast shortcut, but the flavor will be less complex. The long fermentation develops subtle acids that tenderize the crumb; if you are interested in flavor development techniques, see how we balance acid and sugar in our Fudgy Brownie from recipe.
Why is my starter not rising after Day 5 feeding?
The temperature is likely too cold or the yeast has exhausted its initial food supply. Ensure the mixture is warm enough; yeast thrives near 110°F. If temperature is fine, skip the next day's feeding and feed it a slightly larger portion of sugar.
What is the required internal temperature for the finished loaf?
Bake until the internal temperature reaches 190°F (88°C) using an instant read thermometer. This precise temperature ensures the starches are fully set and the loaf won't collapse upon cooling.
Amish Friendship Bread Starter
Ingredients:
Instructions:
Nutrition Facts:
| Calories | 207 kcal |
|---|---|
| Protein | 3.1 g |
| Fat | 5.6 g |
| Carbs | 39 g |
| Fiber | 0.7 g |
| Sugar | 18 g |
| Sodium | 114 mg |
